Saturday, April 30, 2016

SUper Friends Clean and Simple Card Swap

We had a fun gathering this week of my SUper Friends (demonstrator group), including a swap of Clean and Simple cards.  I love what everyone came up with, and I think you will, too!

Here is Fanny's beautiful Mother's Day card, using the Rose Wonder dies:


Fanny used watercolor paper, and watercolored lightly behind the rose and leaves in Watermelon Wonder and Cucumber Crush.  The greeting flags are a perfect touch, too!

Nancy created this simply stunning mini notecard with Cherry Cobbler card stock, and flowers punched out of the Very Vanilla layer using the Petite Petals punch:


The pearls added to the negative space for the flower centers are so elegant, too!  

Judy's brilliant card uses the Just Kidding stamp set, and she cleverly colored the sassy lady from this stamp set using watercolor stamps from the Work of Art stamp set.  She also scored a border around the edges, which is a great way to add a touch of texture and dimension:


The inside cracks me up, too:  


For her card, Connie S. created this gorgeous Christmas thank you note using the Festival of Trees stamp set (which is retiring . . . make sure you get yours before these are gone!).  I love the details she added, like the red glimmer ornaments on the tree (which I think are made with Cherry Cobbler Dazzling Details, but I'm in awe of how perfectly round and uniform Connie was able to make them!  Going to have to find out her secret for that -- maybe she'll leave comment and tell us! ;)  ), the gold star, and the hand-drawn line around the edge -- so nicely done!!!


 Connie designed matching envelopes for her cards as well:


Jana used the retiring hostess set Best Thoughts on watercolor paper, to create this gorgeously colored card:


That's the Birthday Bouquet Designer Series paper in the background, and the sweet bow is a length of Watermelon Wonder Lace Trim (going to miss that!  Might have to stock up before it's retired and gone for good!)

For her cards, Agnes created some beautiful alternate designs with the February 2016 Paper Pumpkin kit (and I had to include a photo of the lovely coordinating envelopes, too!):


And, I had given you a sneak peek of the stamped layer of my card, made with the bonus set from this month's Paper Pumpkin kit, but here's how the finished card turned out:


The doodled line under the greeting is from the Tin of Cards set, and the two dots are Perfect Accents.

I also have some bonus projects to show you!!!  Here's a beautiful bag created by Judy with the retiring Hostess set Floral Wings:


And, Connie S. brought her finished framed art from our last swap to share with us:


Turned out so beautiful!!!!  I love the bright and cheery Hello Honey paper in the background!

Thanks, SUper Friends, for letting me share your amazing works of art!!!

And, thank you for visiting my blog!  Hope you have a wonderful weekend and manage to get in some time to create!

- Michelle

Wednesday, April 27, 2016

Celebrate Everything Card Sneak Peek

Hi, everyone!  Hope you are having a great Wednesday!  I have a quick post today to give you a sneak peek of a card I've been working on for a swap with my SUper Friends demonstrator group tomorrow.  Here it is:


This is just one piece for the card . . . I'll show you the finished card after we've done our swap tomorrow!  I used the Celebrate Everything set, which was the beautiful bonus stamp set that came with this month's Paper Pumpkin, to create this piece.  You might see a bit of rock and roll technique on the largest flower (inked first in Calypso Coral, then rolled the edges in Watermelon Wonder).  I got the intense color by stamping a second time over it with the stamp inked just in Calypso Coral.  Then, I stamped the smaller flower in the center with Watermelon Wonder ink.  The rest of the smaller flowers are stamped in either Calypso Coral or Blushing Bride.  The flower centers are all Crushed Curry, and the leaves are stamped in Mint Macaron.  So fun to play with this new set!  I'm looking forward to doing some more stamping with it soon!

Thanks so much for visiting my blog!

- Michelle

Sunday, April 24, 2016

From Land to Sea Happy Birthday

Hi!  Hope you had a wonderful weekend!  I had a good one -- good time with family, and really enjoyed the time with friends at today's card class!  Speaking of which, I still have one more card to share with you from that, and here it is:


For this card, I used images from the retiring By the Tide stamp set on the Lost Lagoon background, then a strip of the Going Places Designer Paper with the greeting, which is from the Guy Greetings stamp set.  The turtle is from the From Land to Sea stamp set, and is on a circle of Going Places Designer Paper, which is stamped with the coral image from By the Tide, and layered on a Mossy Meadow circle.

This card was inspired by this beautiful card by Amy K., which I saw on Pinterest.  I especially loved her background and the way she used the Going Places paper with the turtle . . . such a wonderful combination!  And, again, a design that serves well for many different occasions (birthday, Father's Day, thanks, and more!)

So, which was your favorite of the five cards from my class (you can see one here, and in my previous 4 posts)?  How would you like to get one of these in the mail from me?  Please leave me a comment below letting me know which card you liked best before next Saturday (4/30/16), and I'll randomly select someone (or two) to receive one of these cards from me!

Thanks so much for visiting my blog!

- Michelle

Saturday, April 23, 2016

Love Knows No Distance Card


Hope you are having a great weekend!  I'm looking forward to cheering on my boys at baseball this afternoon (Greg's coaching, Dan's umpiring, and Timothy is still sidelined as his arm heals, but having fun supporting and cheering on his team!)

For the past few days, I have been sharing photos of the cards we'll be making in my Choose Your Own Adventure Card Class this Sunday.  And, I have another one of those to share with you today.  This one is another masculine card, and is made with the World Traveler Embossing Folder, Going Global stamp set, and a banner with a design from the Going Places Designer Series Paper:


Again, this card is well-suited for many occasions -- I had Father's Day in mind when I chose the greeting, but this greeting could be used for other occasions, or of course, you could stamp an entirely different greeting on the compass.

Hope you can come join the fun at class tomorrow.  Please click here for more information.

Thanks for visiting my blog!

- Michelle

Friday, April 22, 2016

Watercoloring In the Meadow

Hi!  Happy Friday!  Just wanted to pop in here quickly and share another card from my Choose Your Own Adventure Class this weekend.  The first two cards I shared were more on the feminine side, so I wanted this one to be more masculine.  I used the In the Meadow stamp set from the Occasions Catalog, with a bit of masking and then some watercoloring on Shimmery White Card Stock:


I also finally cut into my corrugated paper.  Really like the texture it adds to this card, which is otherwise relatively clean and simple.  There's a loop of Linen Thread behind the greeting as well.

I used a greeting from the In the Meadow set ("To someone who's great to be around . . . "), but as with the other cards for this class, the design is such that this could be a great card for birthday, thanks, Father's Day, and other occasions.  What would you choose?  Hope you can come join the fun.  Please click here for more information.

Thanks so much for visiting my blog!

- Michelle

Thursday, April 21, 2016

A Nice Cuppa Flowers for Mom

Hi!  Happy Thursday!  Today's card is another sample for my Choose Your Own Adventure Card Class coming up this Sunday!  (You can find more information about the class here, and there's still room in it, so if you'd like to sign up, please email me or leave a comment on this post.)

This card was inspired by a couple of cards I found on Pinterest, especially this one by Leonie Shroder and this one from Stampingwithloll.  I used three stamp sets to create my version -- A Nice Cuppa, Petite Petals, and Summer Silhouettes.  A Nice Cuppa and Summer Silhouettes are both on the retiring list, and I am sad to see them go!!!  

Here's how my version of the card turned out:


Again, I designed it with the idea that it would make a great Mother's Day card, but if you change the sentiment, you could have a fun birthday or thank you card, or even a cheery get well or thinking of you . . . lots of possibilities!  What do you think?

Thanks so much for visiting!

- Michelle

Wednesday, April 20, 2016

Time to Celebrate -- Occasions Catalog CASE

Happy Wednesday!  Hope you are having a great day!  I've been busy again with a little travel for the boys' spring break last week, trying to finish up the school's yearbook before the deadline, baseball, and other things . . . including creating cards for my class this Sunday!  Thought I'd share one of those with you today.  This one, I can't take credit for designing -- you can see something pretty similar on page 26 of the Occasions Catalog (I just turned that beautiful bag into a card!)  Here's my version:


My favorite things about this card are the gorgeous 3D flower and stamping on the designer paper -- love how the stamps and paper were designed so that they work together so beautifully!

The greeting I chose for my card comes from the stamp set from the Watercolor Wishes card kit.  In this Sunday's class, you'll be able to select from a variety of greetings -- so you can turn this into a card for birthday, graduation, Mother' Day, thanks, or more!  What would you choose?  Hope you can come join the fun.  Please click here for more information.

Thanks so much for visiting my blog!

- Michelle

Thursday, April 14, 2016

Throwback Thursday: May 2015 Paper Pumpkin Kit - Birthday Bundle

Happy Thursday!  I guess I have Paper Pumpkin on the brain, as I wait anxiously for this month's kit and bonus stamp set (Whoo Hoo!!!) to arrive!!  So, decided it would be fun to do a sort of Throwback Thursday and finally show you the projects I created with the May 2015 Paper Pumpkin kit, Birthday Bundle.

The kit came with supplies and instructions to create four bags and six cards.  I assembled a couple of bags and a couple of cards according to the instructions.  Here are some photos of those:


Then, I decided to cut up the bags and cards, start changing things up a bit, and come up with some alternate creations!  Here are those:


And, maybe my favorite -- some balloon shaker cards:


Thanks so much for checking these out!  If you are a Paper Pumpkin subscriber, you can still get refills for this kit, while supplies last!  Here's the link to see those in my online store.   If you aren't already a Paper Pumpkin subscriber and would like to learn more or sign up, be sure to click here to go to my Paper Pumpkin website! 

- Michelle

P.S.   SPOILER ALERT: For those like me who want to see what's coming even before it is in their mailbox, there are videos for the kit and bonus stamp set up on YouTube now. Here's the link to the kit video: https://www.youtube.com/watch?v=Hvdle-BErxE And, for the bonus stamp set: https://www.youtube.com/watch?v=RcxXdVezH_w

Tuesday, April 12, 2016

March Paper Pumpkin -- Pocketful of Cheer

It's always a happy mail day when there's a Paper Pumpkin in the mailbox, and last month was extra special -- a Bermuda Bay colored box -- to celebrate Paper Pumpkin's third birthday!  


When I opened my box, here's what I discovered -- the kit, plus a flyer announcing another cause for celebration -- the shipping of the one millionth Paper Pumpkin kit!  Who knows, might have been mine?!  ;)  The flyer also announced another surprise -- a special, bonus stamp set in the April kit!!!  


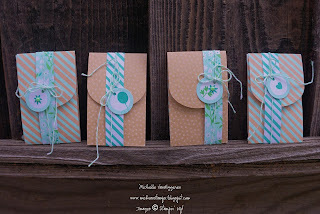
My April kit just shipped today, and I can't wait to see what's inside!!!  Hopefully it will get here quickly!  In the meantime, I can show you some of the creations I've made so far with last month's kit.  First up are four small gift card envelopes I created, staying pretty close to the directions:


I also created a couple of the full-size cards according to the kit's directions (or pretty close):


And, here's one of the cute envelopes with a gift pocket, assembled according to the kit's directions (I decided to cut up the rest and use as designer paper for a bunch cards!  Still need to finish those, though.)


And, here are some alternate card ideas I designed with materials from the kit.  The first two use some Delicate Details Lace Tape and Bermuda Bay striped washi from my stash of retired goodies (went so well with the kit, I couldn't resist using it!):


This one is super clean and simple, using a stamp from the Tin of Cards set, and the stickers for holding the full-size envelope in the kit together:


I'm looking forward to having some time soon to play around with my remaining supplies from the kit and create even more alternate designs.  I also liked this kit so much, I bought a refill kit -- one of the perks of being a Paper Pumpkin subscriber!!!  If you aren't already a Paper Pumpkin subscriber and would like to learn more or sign up, be sure to click here to go to my Paper Pumpkin website! 

Thanks so much for visiting my blog!

- Michelle