Tuesday, March 28, 2023

Forever Fern Cards from March SUper Friends Gathering

 Happy Tuesday!  My SUper Friends group got together on Sunday, and we had a very special make and take!  My friend Jean had shown me a wonderful card class by Gail Ellis, which you can see here, where she made 4 gorgeous cards in 30 minutes using the Forever Fern stamp set and coordinating dies plus other supplies, and I adapted that class for our gathering!   Because of our numbers and time constraints, we used a half sheet of card stock for stamping our own background paper and made two cards .  I had die cuts and layers ready to go, so every one could focus on stamping and assembling.  

Here are my sample cards for the class:  


I used the same colors that Gail did in her class -- Basic White, Sahara Sand, Crumb Cake, Soft Suede, Bermuda Bay and Coastal Cabana.  I changed things up though for the embossing folder used on the Whisper White layers -- I used one of the new Basics 3D Embossing Folders from the online exclusives (these are temporarily sold out, but should be returning sometime around May 1st).   In addition to Forever Fern, I used the Quiet Meadow stamp set for stamping the background words and splatter as well as some of the greetings.  I also used the Decorative Borders stamp set.  Other greetings came from Something Fancy and Graceful Tiles.  Die cut pieces are from the Brilliant Wings set, Desert DetailsDeckled Rectangles, Stylish Shapes, Radiating Stitches, Meadow Dies, and Scalloped Contours Dies.  

Gail showed samples in her class made using Flirty Flamingo and Petal Pink instead of Bermuda Bay and Coastal Cabana, and I decided to make some using that color combination as well and Very Vanilla instead of Basic White.  This time for embossing, I used Timeworn Type and Painted Texture folders.  I also mixed in some die cut hexagons from the Beautiful Shapes dies.  


These were so fun to make!   Which is your favorite of the two color combinations?

I'm looking forward to making more of this style card and have some ideas for other stamp sets to use and other color combinations to try.  

Thanks so much for visiting!

- Michelle  


Wednesday, March 22, 2023

SUper Friends January Valentine's Swap

 Happy Wednesday!  Continuing on with my better late than never theme this week, I finally have our SUper Friends January Valentine's swap cards to share with you!  

(For those who are new here, the SUper Friends is my demonstrator group plus a few friends we've adopted along the way!  Want to join us?  Please leave a comment or send me an email to learn more!)  

On to the cards!

Connie M.'s created her gorgeous card with the Country Floral Lane Suite collection:


Judy's fabulous creation features soft and pretty, but not-so-traditional Valentine's colors, the Gingko Branch Bundle, and the Cane Weave Embossing Folder:


Jaya adorable pocket card features the Adorable Owls Sale-a-Bration set (don't you love how she colored the owl?!  So cute!):


Cathy created her elegant card with heart punches and Paper Pumpkin kit stamps:


Margery created her marvelous faux step fun fold with the Share a Milkshake Bundle, Splatter Embossing Folder, and Dandy Designs Designer Paper from Sale-a-Bration:


Margery and I were thinking along similar lines, as I also used the Share a Milkshake Bundle and Dandy Designs Designer Paper from Sale-a-Bration.  Instead of a waffle cone, I chose to make a milkshake, and you can't tell from the photos, but I added a special touch to the cup by stamping it on the designer paper and then adding a layer of packing tape over that before die cutting.  The greeting die cut and scalloped border were created with dies from the Scalloped Contours set.  I embellished with the  heart pearls.


This was such a fun swap!  And, we had another great swap in February that I'm looking forward to sharing with you soon . . . stay tuned!

Thanks to the SUper Friends for these awesome cards!  And, thank you for visiting my blog!

- Michelle


Monday, March 20, 2023

Mystery Monday Fun

 Happy Monday!  For the past couple Mondays, I have been playing along with Sharon Armstrong's Mystery Stamping, and am looking forward to crafting along with her again today (though still need to cut my papers for today, will have to do that shortly!)   I thought it would be fun to share the cards I made here, too.  

For the first card, I decided to work with some Hello Irresistible Designer Series Paper, the Irresistible Blooms Stamp Set, Loose Frosted Dots (unavailable at the moment, but should be back around May 1st), and the fun cross hatch design from the Basics Embossing Folders (also unavailable at the moment, but back around May 1st): 


This was a quick and easy card to put together, and I think shows that the Hello Irresistible suite can be used to make masculine cards as well!

I used some of my designer series paper scraps to decorate the inside as well:


Then, last week, I decided to use stamps, papers, and embellishments from the Delicate Desert Suite Collection.  Here is how that card turned out:


The succulents/flower images are stamped in Cajun Craze, Calypso Coral and Pale Papaya.  The sentiment is stamped in Smoky Slate.  It seemed an appropriate greeting to use during the fun of Mystery Stamping!

Here's how the inside turned out:


Hope you like these!  Please let me know if you have any questions about them.  (You can also use the links in the text above to view the products I used in my online store).

Thanks so much for visiting my blog. 

- Michelle

Saturday, March 18, 2023

Happy St. Patrick's Day (a little late!)

 Happy Saturday and a belated Happy St. Patrick's Day!  This has been a bit of a crazy week, including windstorms that knocked out power for a couple days, so things haven't quite gone to plan this week, and so, this post is one that I hope qualifies as better late than never!    

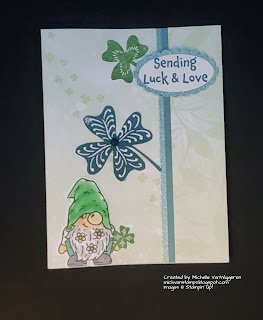
In my last post, I mentioned I'd been making some more cards with the Hello Irresistible Paper (part of the Online Exclusives), following some instructions I found from Rachel Tessman.  Well, I made those cards into St. Patrick's Day cards using the Lucky Clover and Friendly Gnomes stamp sets, along with the coordinating Gnomes Dies.  Here are some photos of how those cards turned out:


And, here's how I finished inside the cards:


A couple weeks back, I also did a fun challenge with my friends Jana and Judy, where we each made cards using the Lucky Clover stamp set and some of the Dandy Designs Designer Series Paper from Sale-a-Bration: 


The sentiments in Lucky Clover are perfect for St. Patrick's Day, but I suppose also good for sending luck and love and telling our friends we're so lucky to have them any time of year!  

Hope you enjoyed these cards.  Please let me know if you have any questions! 

Sending Luck and Love to you!

-Michelle


Monday, March 6, 2023

Hello, Irresistible!

 Happy Monday!  Have you had a chance to check out the new Online Exclusives from Stampin' Up! yet?  I'm having fun with these.  Demonstrators were able to preorder some of the items last month, so I purchased the Hello Irresistible Suite (note: this suite is currently unavailable as a suite, this is because the Loose Frosted Dots are temporarily not available, but it looks like they will be restocked, and the rest of the items in the suite are available still individually) and the Basics Embossing Folders.  And, I have some cards to share that I've been creating with these, plus stayed tuned because I used the Suite to create my February SUper Friends swap card, and I'll be sharing those swaps soon, and I just created another card tonight with it that I will try to post soon as well!

Now, on to the cards!  The first is a birthday card I created:


For this card, I used a Soft Sea Foam base, then layered on a piece of Soft Succulent Fine Shimmer Paper, which I embossed using one of the Basics 3D Embossing Folders.  On top of that, I added a piece of the Hello Irresistible Designer Series Paper.  The flowers and leaves are also cut out of the designer series paper using the coordinating dies from the Irresistible Blooms Bundle. I stamped the greeting on another piece of the designer series paper.   The sparkly lines and dots were cut with the Irresistible Blooms Dies from the Fine Shimmer Paper.  I finished the card with some of the Loose Frosted Dots (again, currently unavailable, but hopefully back in stock very soon!)  

We also used the Hello Irresistible Designer Series Paper for one of the make and take cards at a recent gathering of my SUper Friends demonstrator group.  (You can see the other card we made in this post, if you scroll down, it is near the bottom of the post.)  Rachel Tessman recently shared an idea with the Hello Irresistible Designer Paper that allows you to show off both sides of the paper as part of your card, and I though that was a wonderful way to use this and other 6 x 6 designer papers.  Here are the cards I made following Rachel's instructions (and I'm having so much fun with this idea, I do have some more cards in the works!):


Here are some closer views of a few of the cards:


You can see that I again used the Fine Shimmer Paper to layer in with the cards, and the Loose Frosted Dots to embellish.  The greetings are all from the Irresistible Blooms stamp set.

I also used the Irresistible Blooms stamps to finish the inside of the cards:


Hope you enjoyed these!  Please leave me a comment and let me know if you have any questions about these.


Thanks so much for visiting my blog!


- Michelle