Monday, July 31, 2017

A Lovely Little Daisy Wreath

Happy Monday!  First, an important announcement -- it's the last day of Stampin' Up!'s Bonus Days!
For each $50 in merchandise you purchase in July, you'll get a $5 code to redeem in August!  You can see more details about this great offer here.  And, if you've ever considered joining me as a Stampin' Up! Demonstrator, it's Christmas in July . . . you can find out what that means by clicking here or contacting me for more information!  Be sure to take advantage of these great deals before it's too late!!!

Today I have a fun wreath to share with you that I created using the 2017-2019 In Colorsthe Daisy Delight Bundle, and Paper Pumpkin (April 2016 Lovely Little Wreath kit is the base for these wreaths)!  I actually made two of these wreaths -- one for my most recent swap with Marlene and another to be the door prize at my New Catalog Open House this Sunday!  


The ribbon is the Berry Burst 1/2" Finely Woven Ribbon.  The daisy centers were stamped with a combination of Daffodil Delight and Peekaboo Peach.

Thanks so much for visiting my blog!  For more information about this Sunday's Open House and other upcoming events, please click here or leave me a comment!

- Michelle

Saturday, July 29, 2017

Whipping Up Some Coffee Cards

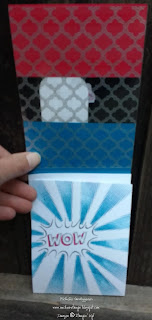
One of my favorite new bundles from the 2017-18 Annual Catalog is the Coffee Cafe Bundle!  I decided to create an over-the-top, technique filled card with it for a recent swap with my friend Marlene!  The idea that I came up with was to create a special background using the new Marbled Background Stamp and the emboss-resist technique.  For my embossing, I used three different colors of embossing powder -- Gold, Copper, and Clear -- randomly sprinkled onto my background stamped image and then heated.  Then, I sponged on Early Espresso Ink over the embossed image.  The background turned out so neat, I didn't want to permanently cover it up, so ended up creating a tri-fold card that would show it off.  Here's how that turned out:


I dressed up the card front with a layer of Copper Foil, the greeting is on pieces cut with the Stitched Shapes Framelits and Layering Oval Framelits, there is a bow made with Copper Trim on the coffee cup, which was cut out of the Coffee Break Designer Series Paper using one of the dies from the Coffee Cafe Bundle, as were the coffee beans, which have some loops of Copper Metallic Thread behind them.  I added a bit of Fine-Tip Glue on top of the coffee lid and coffee beans for extra shine and dimension.


And, here's another version, with a different greeting from the same set:


The adorable little coffee cups I used on the inside of the card were also cut from the Coffee Break Designer Series Paper using one of the dies from the Coffee Cafe Bundle.

I also used the Coffee Break Designer Series Paper to decorate the envelopes, so they'd coordinate nicely:


And, in case you were curious, here's how the background piece looked right after embossing (done on Whisper White card stock):


I actually created four backgrounds, and each turned out a bit different:


Here's a close up of the one I'd already inked up with Early Espresso:


This background kind of reminds me of the fancy foam on a latte . . . how about you?

Thanks so much for stopping by!  Hope you are having a great weekend!

- Michelle

Friday, July 28, 2017

Fabulous Friends Friday: Sweet Cards from Judy

Happy Friday!  It's been too long since my last Fabulous Friends Friday post, and I have a couple super-sweet cards from the amazingly talented Judy-Ann to share with you!

First off, this adorable easel card, created with the This Little Piggy stamp set and beautiful background designs from the Fresh Florals Designer Series Paper Stack:


And, this beauty, with the sunflower and greeting from the Eastern Beauty Bundle, and leaves, which I believe are from the Rose Garden Thinlits:


Thanks, Judy-Ann, for these beauties!  And, thank you for visiting my blog!

- Michelle

P.S.  Don't forget, it's Stampin' Up! Bonus Days this month -- for each $50 in merchandise you purchase in July, you'll get a $5 code to redeem in August!  You can see more details about this great offer here.  And, if you've ever considered joining me as a Stampin' Up! Demonstrator, it's Christmas in July . . . you can find out what that means by clicking here or contacting me for more information!  Be sure to take advantage of these great deals before it's too late!!!

Thursday, July 27, 2017

Throwback Thursday: Hats off to Grads and Heros!

Hi!  Happy Thursday!  Hope you are having a great day!   Thought I'd do a throwback to end of last school year today, as the start of the next one is definitely on my mind!  

Here's a special graduation card I had fun creating with the Large Numbers Framelits Dies:


I used Silver Glimmer Paper for sparkle behind the cut out numbers and there's also a Silver Foil Sheet layer on top of the card base.

The next card is a thank you I created for one of my co-workers at school who is truly a super hero!  I used the now-retired Everyday Hero stamp set on this, as well as the still current Thoughtful Banners set, coordinating Duet Banner Punch and Best Badge Punch, and some Fabulous Foil Acetate:


Hope you enjoyed these creations!

Thanks for visiting my blog!!!
-Michelle

P.S.  Don't forget, it's Stampin' Up! Bonus Days this month -- for each $50 in merchandise you purchase in July, you'll get a $5 code to redeem in August!  You can see more details about this great offer here.  And, if you've ever considered joining me as a Stampin' Up! Demonstrator, it's Christmas in July . . . you can find out what that means by clicking here or contacting me for more information!  Be sure to take advantage of these great deals before it's too late!!!

Tuesday, July 25, 2017

A Birthday Tag with Balloons and Sparkle

Hi!  Did you miss me?  I'm back after a bit of vacation time -- was great to have a chance to visit some of our family in the Midwest and spend some relaxing time at the Lake of the Ozarks!  Still need to upload photos from our trip, and will see about sharing some of those after I do!  In the meantime, I have a fun project to share with you that I created for my fabulous friend and swapping buddy Marlene for her birthday -- and was able to include in my last swap box to her!  I dressed up a package of chocolates with a fun tag.  Here it is:


And, here's the back of the tag:


Supplies used for the tag (follow the links to see them in my online store):

Stamps:  Happy Birthday Gorgeous Stamp Set (available in a bundle and save with the Happy Birthday Thinlits, also used on this project!)

Ink:  Berry Burst


Tools & Accessories:  Happy Birthday Thinlits (cut one piece out of Berry Burst and one from Flirty Flamingo and layer), Balloon Bouquet Punch, Gold Binder Clips, Glitter Enamel Dots, Berry Burst 1/2" Finely Woven Ribbon, Linen Thread, Clear Wink of Stella (on balloons -- photos don't catch it, but really sparkly and pretty in real life!)

Those with sharp eyes might recognize the top Happy Birthday die cut as the piece that was cut out from this card I showed you a couple weeks ago.

Thanks for visiting my blog!!!
Michelle

P.S.  Don't forget, it's Stampin' Up! Bonus Days this month -- for each $50 in merchandise you purchase in July, you'll get a $5 code to redeem in August!  You can see more details about this great offer here.  And, if you've ever considered joining me as a Stampin' Up! Demonstrator, it's Christmas in July . . . you can find out what that means by clicking here or contacting me for more information!  Be sure to take advantage of these great deals before it's too late!!!

Wednesday, July 12, 2017

Giants Thank Yous

Another quick post today!   This one is a card I created for my husband, who managed our youngest son's Little League baseball team, to present to his coaches and team mom to express his thanks.  Their team was the Giants, so chose Tangerine Tango and Basic Black to match their colors.  


The "thanks" is die cut from Gold Foil using one of the Hello You Thinlits (retired).  The black stripes were cut with a die from the Swirly Scribbles Thinlits.   I created the baseball by die cutting a circle with the Layering Circles Framelits, and stamping it with an image from the Banner Surprise (June 2016) kit.  The stars are from the Extreme Elements stamp set (retired).

Thanks so much for visiting my blog!

- Michelle

Tuesday, July 11, 2017

Happy Birthday Daisies

Happy Tuesday!  Quick post today to share a fun birthday card I created with the new Daisy Delight stamp set and coordinating punch (which has been wildly popular and consequently hard to catch in stock!):


The "Happy Birthday" is actually a negative, left when I die cut the words out of the Berry Burst layer.  I carefully glued the little center pieces of the letters back in, and used the die cut words on another project (stay tuned for that!)

Supplies Used:
Stamps:  Daisy Delight stamp set
Ink:  Berry Burst, Lemon Lime Twist, Powder Pink
Paper:  Whisper White, Berry Burst, and Lemon Lime Twist
Accessories:  Daisy punch, Happy Birthday Thinlits Die, Gold Faceted Gem

Thanks so much for visiting my blog!

- Michelle

Monday, July 10, 2017

A Few More Sweet Summer Ice Cream Cards!

Okay, I'll admit it, once I got started playing with the Cool Treats stamp set and Frozen Treats Framelits, I had trouble stopping!  Here are a few more cards I created with those, along with pieces from the  Banner Surprise Paper Pumpkin kit, and for the bottom two cards, Tasty Treats Specialty Paper (now retired) and the stamps from the Sprinkled with Love (May 2017) Paper Pumpkin kit:


Hope you have a sweet day!

Thanks for visiting my blog!

- Michelle

Friday, July 7, 2017

Embossed Summer Sweets

Happy Friday!  Here are a few more cards that came out of my efforts at "finishing" up my Banner Surprise Paper Pumpkin kit (in case you missed some of the others, you can see them in this blog post).  On these cards, I had fun trying out Stampin' Up!'s new embossing paste, along with the new Pattern Party Decorative Masks (and, I guess you can tell which of those is my favorite when I have ice cream and cupcakes in mind):


Supplies Used:

Stamps:  Cool Treats, Coffee Cafe, Happy Birthday Gorgeous (greetings and fussy-cut flowers on second cupcake card)
Ink:  Early Espresso, Powder Pink, Calypso Coral
Paper:  Crumb Cake, Powder Pink, Soft Suede, Early Espresso, Whisper White, Mint Macaron (retired), Banner Surprise Paper Pumpkin kit Envelope Paper (cupcake icing)
Embossing:  Embossing pastePattern Party Decorative Masks, and Palette Knives
Dies:  Stitched Shapes Framelits, Layering Oval Framelits, Layering Circle Framelits, Coffee Cups Framelits, Frozen Treats Framelits
Ribbons:  Calypso Coral Ombre, Calypso Coral Mini Stripe Ribbon (retired)
Other Accessories:  Sequins (from Banner Surprise Paper Pumpkin kit), Glitter Enamel Dots, Pearl Basic Jewels

I think the Powder Pink triple-scoop ice cream card is my favorite of this bunch, if I had to pick one!   (And, I have to confess I'm pleasantly surprised how much I'm enjoying using Powder Pink!)  What do you think?  

Thanks for visiting my blog!

- Michelle

P.S.  Don't forget, it's Stampin' Up! Bonus Days this month -- for each $50 in merchandise you purchase in July, you'll get a $5 code to redeem in August!  You can see more details about this great offer here.  And, if you've ever considered joining me as a Stampin' Up! Demonstrator, it's Christmas in July . . . you can find out what that means by clicking here or contacting me for more information!

Thursday, July 6, 2017

Nothing Little About the Light You Shine

Hi!  Quick post today that's sort of a "Throwback Thursday" because I created this card for a masculine-themed swap back in April!  


Supplies Used:

Stamps:  High Tide Photopolymer Stamp Set
Ink: Early Espresso, Real Red, Crumb Cake, Bermuda Bay, So Saffron and Peekaboo Peach Classic Ink Pads
Paper:  Thick Very Vanilla(card base and for watercolor / lighthouse layer), So Saffron, and Early Espresso Card Stock; Cupcakes and Carousels Designer Series Paper (retired)

Techniques: Watercoloring on Thick Card Stock (made the sunset by coloring lightly in horizontal strokes with Daffodil Delight and Pumpkin Pie pencils on at the bottom, then above that Melon Mambo, Rich Razzleberry, Bermuda Bay, and Pacific Point pencils.  Lightly colored over the lines to blend with an Aquapainter; ocean is stamped in Bermuda Bay ink, with Bermuda Bay pencil colored in between the lines and Peekaboo Peach stamped in as well, then blended with an Aquapainter and a bit of Clear Wink of Stella).  Two Step Stampin' (the lighthouse is stamped with one image in Real Red and then a second, overlapping image in Early Espresso).

If I were doing this card over again, I might stamp the beach in a darker color than Crumb Cake -- perhaps Early Espresso?  What do you think?

By the way, in case you haven't seen, it's Stampin' Up! Bonus Days this month -- basically for each $50 in merchandise you purchase in July, you'll get a $5 code to redeem in August!  You can see more details about this great offer here.  And, if you've ever considered joining me as a Stampin' Up! Demonstrator, it's Christmas in July . . . you can find out what that means by clicking here or contacting me for more information!

Thanks for visiting my blog!

- Michelle


Monday, July 3, 2017

A Bit of Summer Cleaning Cont'd -- New Creations with Banner Surprise Paper Pumpkin Kit

As you might remember from my last post, I've been doing a bit of summer craft room cleaning, which has included catching up on and reducing my number of unfinished Paper Pumpkin kits!  If only all cleaning could be so fun!  ;)  

The next Paper Pumpkin kit I picked up is the Banner Surprise Kit from June 2016, and this one is actually also still available in the Online Store, although only while supplies last . . . and you can see the full kit here and the refill kit here

I started by cutting the card bases apart to use as layers.  This is a relatively simple card I created using the circle element, stamped with images from the kit's stamp set, the washi tape from the kit, and gold star stickers from the kit (inspiration for this card came from Pinterest -- you can see my board with alternate ideas for this kit here):


Next, I decided to do a variation on that idea, with flowers and leaves from the new Oh So Eclectic Bundle:


I used Berry Burst, Fresh Fig, Early Espresso, and Peekaboo Peach inks on this card.

Then, I decided to create some shaker cards with this kit and the fabulous sequins that come in it!  I used the Frozen Treats Framelits and coordinating Cool Treats stamp set with my Paper Pumpkin kit materials to create these cards:


I also decided to make some shaker cupcakes with the dies from the new Coffee Cafe bundle:


Not content to let the die cut pieces from the shaker cards go to waste, I created a few more cards with those, and used the paper from the kit's envelopes for the backgrounds and layers embossed with the Softly Falling folder:


The friend die cut is from the Lovely Words Thinlits Dies.


Hope you enjoyed seeing these as much as I enjoyed making them!  Definitely some summery-sweet cards, right?!

Thanks so much for visiting my blog!

- Michelle