Sunday, March 31, 2024

Happy Easter! February Sweet Springtime Paper Pumpkin Kit Projects

 Happy Easter!  Hope you are having a wonderful day!  

Today I have a bunch of projects to share with you that I created using the February 2024 Paper Pumpkin kit!  This kit featured some adorable chicks and bunnies.  You'll see I really had fun creating cards and more with these -- even after I used up the cards and elements that came in the kit!   

The cards in the first two photos I created by following the kit's instructions exactly:


For the next design, however, I decided to cut the cards in half and add them to white card bases, so I could maximize my use of the beautiful patterns printed on the kit's cards:


After using the kit elements to decorate the first three cards following pretty closely to the kit instructions (I just cut off one flower from the bottom of the flower wreath to use on other cards), I used the stamps from the kit to create bunnies, chicks, and daffodils to decorate the next cards, and used dies from the Paper Pumpkin add on for the greeting, and from Thoughtful Expressions for the "windows" on the cards: 


The kit also came with some adorable treat boxes.  I made 3 of them, though rather than attaching the bunny and chick directly to the box, I decided to attach them to tags I created with dies from the Thoughtful Expressions Bundle.  The little flowers were also made with dies from Thoughtful Expressions, and the flower centers were made by coloring the white dots that came in the kit with Stampin' Blends:


Here are cards I made with the remaining pieces from the kit:


Here is a fun card I made with just some chicks:


And, I was having so much fun, I ended up making more cards with the bunny and chick stamps and some designer series papers:


Thanks so much for visiting my blog!  Please let me know if you have any questions about these projects or would like more information about Paper Pumpkin!

- Michelle


Friday, March 29, 2024

Easter Basket and Rocker Card from Marlene -- and the Card her Card Inspired!

 I received a fun box from my friend Marlene this week, which included a basket full of goodies and a beautiful Easter card!  I was inspired by the layout of that Easter card to create a rocker card with the Latte Love set!  Here are some photos of the basket and cards!


Marlene's beautiful card uses the Excellent Eggs Bundle and features some beautiful embossing and touches of Enamel Effects!  The card base is created with one of the large circles from the Deckled Circles Dies.

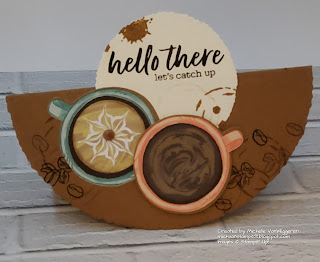
I decided to CASE Marlene's card and create a rocker card with the Latte Love Suite Collection.  I substituted stamped images for the embossing, used coffee cups die cut from the suite's designer paper, and added a smaller Very Vanilla Deckled Circle die cut with the greeting and some stamped images behind the coffee cups.  Here are the two cards together:


And, some close ups of my card:


Thanks so much for visiting my blog!  Hope these ideas inspire you to create something fun as well!  Please let me know if you have any questions about these projects.

- Michelle


Thursday, March 28, 2024

Sneak Peek: Spotlight on Nature Cards

 Last week, I got together with Judy and Jana for a visit and some stamping.  We decided to use the Spotlight on Nature Bundle, which I had gotten at OnStage Houston and which will be in the new catalog coming in May!  Here are the cards we each created, with special thanks to Judy for taking photos of our cards:


The bundle comes with some fun circle dies, and each of us decided to use those in different ways as we created our cards.

You may spy some new In Colors on Jana's and my cards as well -- we both used Peach Pie, and I also used Summer Splash!

I can't wait for you to see more of what's in store in the new catalog!!!

- Michelle


Wednesday, March 27, 2024

Easter Home Decor Projects

 If you caught my Facebook Live today, you saw some projects I've been working on plus some of the swaps I received at OnStage Houston!  I thought I'd pop over here and share some of those projects as well, starting with two Easter home decor projects I recently finished.  

The first project is a light-up bunny.  I painted this with acrylic paint to get the nice brown color, then used some Stampin' Up! supplies to complete its transformation.  I actually made two of these, one for myself and one to send to my friend Marlene as part of a swap.  Here they are together:


And, here are some close ups:


The main difference between the two pieces is the color of card stock I used for the ears.  For my bunny, I used some card stock left over from one of my OnStage swaps -- it was Bubble Bath, sponged with Melon Mambo.  For Marlene's bunny, I used Petal Pink card stock.  Other supplies used on the bunnies are embossing paste on the tail, and Zinnia designer series paper behind the cut out flowers and around the bunny's neck.  I used black Enamel Effects for the bunnies' eyes and mouth, and a combination of White and Red Enamel Effects for the little pink nose.  The flower is cut from Melon Mambo with Sentimental Park dies, with a daffodil delight center cut with the small die cut from the Zinnia dies, and leaves cut from Garden Green with a die from the Paper Florist dies.  I added a dot of Gold Enamel Effects in the flower center.  I also added a Linen Thread bow near the flower.  

The second project is an Easter egg.  Again, I started by painting the unfinished wood piece with some acrylic paint, this time in a shade of yellow that reminds me of Lemon Lolly.  Then, I added flowers cut with the Paper Florist dies on one side.  The "Happy Easter" is from the Excellent Eggs stamp set.  On the other side, I added circles cut out of Meandering Meadow Designer Series Paper with the new Spotlight on Nature circle dies (which will be available when the 2024-2025 Annual Catalog goes live in May!), and the "Happy Spring" from the Excellent Eggs stamp set.  


Hope you like these ideas!   Thanks for visiting my blog!

-- Michelle


Thursday, March 21, 2024

OnStage Houston 2024: Roommate Gifts

I put together a couple OnStage "survival kit" goodie bags for my dear friends and roommates at OnStage!  These little bags included some snacks, mini post its for flagging favorite items in the new catalogs, and a special tag, which could also be used on the bag we received from Stampin' Up! as part of our OnStage goodies.  

I made the tags with the Everyday Details Dies, and I blanket stitched around the dies with Balmy Blue Baker's Twine.  The letters are cut with the Mini Alphabet Dies and I used dies from Excellent Eggs, Thoughtful Moments, and Radiating Stitches Dies to add some artistic elements that echoed Stampin' Up!'s logos for the event.


Thanks so much for visiting my blog!

- Michelle
Wednesday, March 20, 2024

OnStage Houston 2024: My Swap

 Hello!  I'm back from Houston, and it's taken me a couple days, but I'm finally getting back into my regular routine!  And, I finally have all of my OnStage swap cards to show you!   

I ended up making 3 different card designs to swap.    I first created the Zinnia peek a boo card with stitching, which I previewed here in this post, which has all the details about this card:


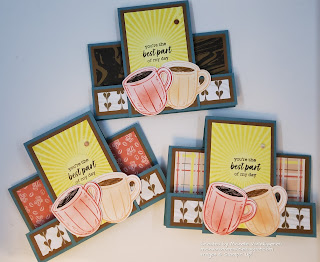
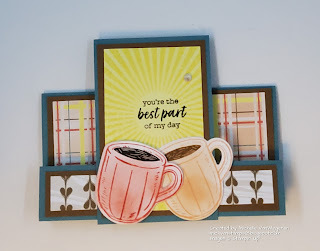
The next card, and really the bulk of my swaps, was a fancy fold faux center step card with the Latte Love Suite.  My card was inspired by a fancy fold I'd received from Connie M. (stay tuned to see her card when I finally share the SUper Friends February Fun Fold swaps!):


Here's the stamping on the back of the card: 


I ended up using three different designer series patterns to have enough for the back step of the front of the card.  The sunburst image is the Rays of Light Background Stamp


Stamping this greeting made me think of the Folger's coffee jingle!  Can you hear that when you read the greeting, or is that just me?

My final card was an Easter card mashing up stamps and dies from the Hot Air Balloon Bundle and Excellent Eggs Bundle.  The flowers are die cut using a couple of the Sentimental Park Dies, with Rainbow Adhesive-Backed Dots in the Center.  I used the Basic Borders Dies to make the grass out of Granny Apple Green Card Stock.


Which card do you like best?

Thanks for visiting my blog!

- Michelle