Monday, November 30, 2009

so many toys, so little time!

Definitely describes how I feel about my craft supplies!  However, in this case, also perfectly describes the situation in my littlest guy's bedroom!  My husband spotted this toy chest at a garage sale the weekend before last, and when we brought it home, I realized it was the perfect place to add the "So many toys, so little time" Decor Element I'd had to have, but hadn't quite figured out where to put yet!   In fact, I applied it right away.  Here is the finished chest:


Don't forget, you can get a free Decor Element (up to $16.95 in value) for every $50 in merchandise you purchase from Stampin' Up!'s Holiday Gift-Giving Guide!  You can even get your own "So Many Toys, So Little Time" piece to add to your home decor!  (Perfect in craft rooms as well as kids' bedrooms!)

Also, just a quick reminder that if you haven't had a chance to leave a comment on my blog candy post yet, you should head over there as soon as possible -- by tonight (Nov. 30th) at midnight at the latest!  I'll announce the winner tomorrow, as well as give the answer to how many punches I used to create the turkey on my blog header! 

- Michelle

Monday, November 23, 2009

Online Holiday Extravaganza This Week!

Stampin' Up!'s online Holiday Extravaganza sale is on, and it has some really great deals!  There are product bundles up to 50% off.  You'll want to be sure to check this out . . . visit my online store at http://www.michellevanwiggeren.stampinup.net/, and click on the shop now button in the upper right hand corner.  You'll see all the great deals there under Online Extravaganza!

-Michelle

Sunday, November 22, 2009

Butterfly Stencil Decor Elements Tote Bag


Here's the second bag I made using the technique I blogged about yesterday!  Really like how this one turned out (no overbleaching boo-boos this time!).

Instead of using pre-made Decor Elements, this time I made my own stencil shapes using Decor Elements Vinyl Sheets and the Big Shot.  I cut a piece of the vinyl sheet, and ran it through the big shot using the Bigz Butterfly Die.  Then, I was able to just peel the backing off the vinyl butterflies and stick them where I wanted on my tote bag.  I decided not to use the transfer sheets, and that worked out fine.

Here's the first side I did:
 

And, here's the other side (this time the vinyl didn't stick quite as securely, so some of the bleach worked under the edges of the images a little bit.  The images aren't quite as "crisp" but I still like the look).


I think this could be a fun way to make some personalized gifts or could be used as gift packaging!  This technique can be used on other fabric items, too . . . like shirts, pants, Christmas stocking, etc.... 

Instead of using bleach, you could also use fabric paint, too! 

- Michelle

Saturday, November 21, 2009

Decor Elements -- Fabric Stencil Technique


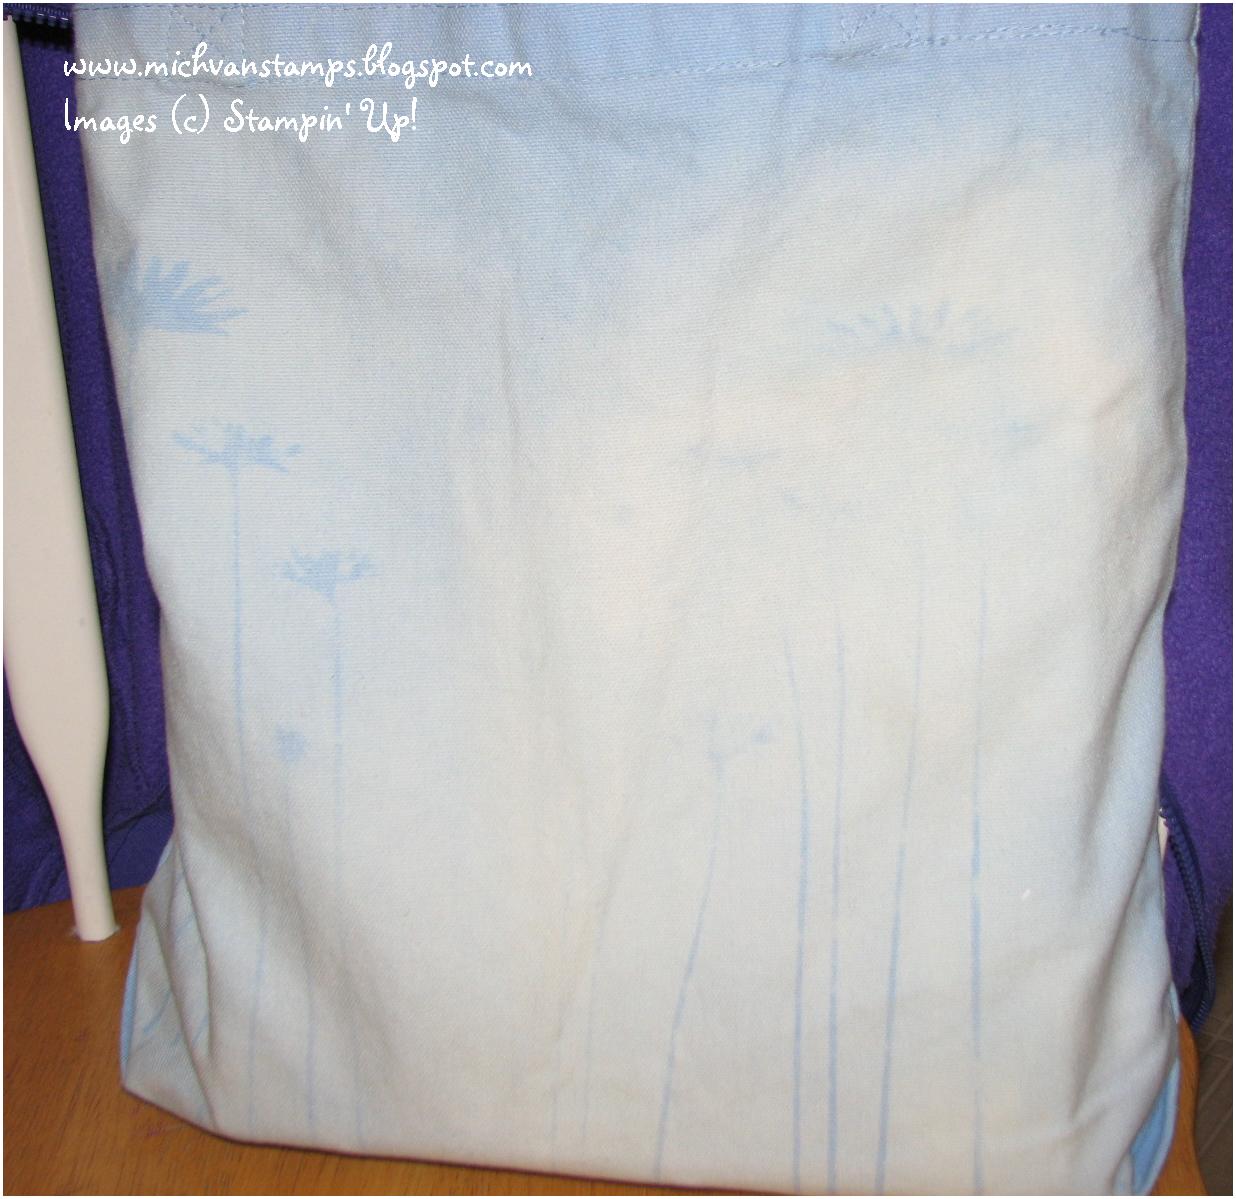
      Stampin' Up! recently had a video tutorial for demonstrators showing a fun technique with Decor Elements -- using them as a stencil on fabric, then bleaching around the stencil for a really cool look!  While it is easiest to apply Decor Elements on smooth, non-textured surfaces, with some patience, they definitely can be applied to surfaces with texture as well (in fact, I managed to apply some to a textured wall surface in my kitchen and have applied them to the cover of a linen photo album -- will photograph those and post another day . . . ). 

       Anyway, I had to try this technique!  I found some tote bags, and started playing.  Here is a photo of some Upsy Daisy decor elements applied to a tote bag.  The craft mat is placed inside the tote bag, so when the bleach is applied it will not soak through to the other side of the bag.


Next, I sprayed around the Decor Elements with a small spray bottle (an empty Stampin' Mist or travel size hairspray bottle would work well) filled with a mixture of half bleach, half water.  The first time I did this, I got a little carried away (that was on the right side of bag below--the whitest side!).  It really only takes a few spritzes around the flowers -- enough to make it wet, but not totally saturated!  Then, once you can see the bleach reaction starting, you can rinse the fabric in the sink to slow down and ultimately stop the bleaching. 


More of a close up:


The Decor Elements came off easily during the rinsing, and I was able to save them and use again around the bag.  (Note: The Decor Elements really do work best when the adhesive is freshest, since this really helps hold and prevent the bleach from soaking under the Element.  When there is no longer enough adhesive to hold tight to the fabric for this technique, I plan to use them as stencils for my cardmaking!  Will post a sample of that when I get one made.)

The other side of the bag (much better than the first, since I got the hang of not over doing it with the bleach!):


Tomorrow I have another altered tote bag to show you -- using vinyl butterflies cut with the Big Shot!  I was able to get the vinyl sheets for free with the Holiday Extravaganza -- right now, for each $50 you spend on products from the Holiday Gift-Giving Guide, you receive a free Decor Elements piece (up to a $16.95 value)!   Want to do some shopping?  Click here and then click the shop now button near the top of the page to visit my online store!

- Michelle

Friday, November 20, 2009

Time for Blog Candy!

   This is such a wonderful time of year to say thank you -- so I decided to say thank you to you for visiting my blog by offering some blog candy!  I have a Bitty Basics stamp set (in case you missed this adorable hostess set when it was in the catalog!) and a CD folder scrapbook I created (ready for your photos, journaling, and a few more embellishments!)


A couple photos of the inside of the scrapbook:


To enter, simply leave a comment in this blog post before midnight on November 30th!  (For those seeing this on Facebook, please be sure to visit the actual blog to leave your comment.)  I'll randomly select a winner from those who leave comments.  I will announce the winner on December 1st.

And, for an extra challenge -- you may have noticed that I have a new Thanksgiving blog header.  I created this one in My Digital Studio, too.  Can you guess how many digital punches I used to create the turkey?  I'll give the answer to that on December 1st, too. 

- Michelle

Thursday, November 19, 2009

Another Finished Sunny Day Card!

 A while back, I used the Sunny Day Simply Scrappin' kit to create 30 cards. I shared a number of them with you in this post.  Well, I recently finished another card from my set of 30, and wanted to share that with you. Here it is: 


The little bird on the die cut adhesive is just so adorable, and I thought a sweet flower would be just the right touch.  So, I punched out a Pumpkin Pie flower punched with the Trio Flower punch, put an Apricot Appeal brad through the center, and attached that to the card.

The greeting is from Sincere Salutations, and was stamped directly on the die cut adhesive using Tempting Turquoise Classic Ink.

These cards are so much fun to have on hand -- and you could even bundle some and give them as a gift!  Please contact me if you'd like me to put a kit together with the supplies and instructions for you to create 30 cards from a Simply Scrappin' kit!

Wednesday, November 18, 2009

My Digital Studio "Hybrid" Card

We attended a birthday party this weekend for one of Timothy's good friends, and I wanted to create a special card -- I had something special in mind, and decided to create a card with some hand stamped elements and some printed from My Digital Studio!  Here's what I made:


The card base was created by cutting an 5.5 x 8.5 inch folded piece of Tempting Turquoise card stock with the Scallop Square Big Shot die. The clouds layer was created in My Digital Studio using the Sunny Day cloud elements, and the greetings on the card front and inside were also created in My Digital Studio and printed from my home printer (they printed well -- not quite as crisp or as well color-coordinated as something printed from Stampin' Up!'s professional services, but definitely good enough for my purposes!)  Here's a close up of the front greeting:


The rocket image is from the Pun Fun stamp set.  I drew the clouds coming out the bottom with my water color pencils, and used those and a blender pen to color the rest of the image as well.  The little yellow stars were die cut using the Stampin' Up! Beary Boy sizzlit from Stampin' Up!'s Build a Bear line.  I added the gold outline on the stars, as well as the dots and highlights on the rocket with my Zig Painty pen.


I stamped some alien images inside the card, using the Greetings Earthling set and Tempting Turquoise classic ink.


I love how I was able to use Digital Studio to supplement the stamp sets and designer papers I have on hand and still create a handmade card!!!

- Michelle


Tuesday, November 17, 2009

My Digital Studio -- My 2 For the Price of 1 Tip!

As you know, I'm having great fun creating projects with My Digital Studio.  Today, I wanted to share with you how I created two cards after professionally printing one.  (There are some other wonderful hints and tips for doing this out there -- such as this post from Patty Bennett, but I haven't seen my idea out there yet . . . so wanted to be sure to share!).  

When you print a card through Stampin' Up!'s professional printing services, you receive the card plus a proof sheet with it.   Here's one from the "Extreme Halloween" card I created and printed last month:


As you can see, the proof sheet displays a smaller version of your printed card front.  Not being one to want to waste perfectly good card stock (as those who have seen my scrap organizers well know!), I saw a perfect opportunity to create another card!  Depending on the orientation of your image, you can either turn the proof sheet into a card, or use a paper trimmer to cut out the image and then layer it onto another piece of card stock.  For example, because of the way it is oriented, my Extreme Halloween card front proof would have to be cut out and then layered onto another piece of paper.

Here is an example of a card I printed through Stampin' Up!'s print services -- this is actually one of the professionally designed 5 x 7 cards using the Hoppy Memories kit -- as well as the smaller card I was able to create from the proof sheet.  In this case, the way the image was oriented on the proof sheet was perfect for turning the proof sheet into a card.  All I had to do was trim around the edges (the scoring on the proof card even worked perfectly with my image).   Here are my cards:


The smaller card is 3.5 inches by 4.75 inches.  Don't you just love that little frog?!

- Michelle

Wednesday, November 11, 2009

Beary Merry Christmas Ornaments

Can't believe it's already been a week since my last post -- that time just flew!  Have been busy here with a number of things.  One of the projects I have been working on is making ornaments with Timothy's play group.  Wanted to share with you a few samples of what we've been making.  The first is the bear I created as a sample:


This bear is made using the Stampin' Up! Bear die, and the bear's adorable Santa suit was created using the Stampin' Up! Beary Merry die.   Just love these dies!!! 

The kids have been having fun coming up with their own creations as well.  Daniel even decided to use some scraps of paper and create elf ears for his bear.  Here's how that turned out:


And, a few more bears by Daniel and Timothy:


So cute!!!  And, great fun to make -- for kids and adults alike. 

Hmmm . . . gives me an idea . . . I have been trying to figure out what to offer for my next blog candy . . . perhaps will be a kit with some die cut Build a Bear pieces for the winner!  What do you think?

- Michelle

Wednesday, November 4, 2009

Christmas Scrapbook in a Tin Ornament

Here's another project I made for a recent swap -- a candy tin altered into an ornament and filled with pages for a mini scrapbook to fill with special Christmas memories!

The candy tin I used already had a window in the front, so I wanted to take advantage of that and make a "shaker" window there.  I cut a circle out of designer paper to place behind the window, then cut a larger circle to decorate the outside around it.  I love this designer paper -- it is the Christmas Cocoa Specialty Designer Series Paper from the Holiday Mini -- very elegant! 


Inside the shaker, I filled with clear microbeads (though they look almost white like snow in the photo above.  Here's a better close up:


The stamped image is from the Holiday Best set.  I used markers to put the Old Olive and Real Red where I wanted them on the rubber image before stamping.  I sponged everything with some Champagne Shimmer Paint for some added sparkle. 

I punched two holes in the bottom half of the tin with the Crop-a-Dile, and threaded the Whisper White Taffeta Ribbon through it.  Around the tin, I used sticky strip to attach Chocolate Chip Taffeta Ribbon, which also helped hide some writing around the tin.

For the scrapbook tucked inside, I cut circles of the designer series paper, and tied those together with another piece of the Whisper White Taffeta Ribbon.


I have a Scrapbook in a Tin Ornament class coming up in early December, and this will be one of the designs you can choose for that class.  If you are interested in the class or a class kit, please leave me a comment or email me for more information.

- Michelle

Tuesday, November 3, 2009

Treats, treats, and more treats . . .

I was thinking about it today, and it has been more than a week since I actually made a card!  That's a long time for me.  Hopefully, I can remedy that soon.

Instead, I've been working on treat bags!  I think in the past week I've made more than 50.  Some of those, I made on Sunday night for Timothy's birthday celebration at preschool on Monday.  I can't believe my little guy is now 4 years old!!!  Where did the time go?

For Timothy's school treats, I'd found some great coloring books and copies of one of our favorite books from the Elmo's neighborhood series.  They would have fit wonderfully in one of Stampin' Up!'s large cello bags, but unfortunately, I had not planned ahead and didn't happen to have any around!  I decided to improvise and use some clear 3 ring binder pages to hold the treats . . . and that worked okay, although those are actually a bit slick, so more of a challenge for little hands to keep a good hold on them than I would have liked.   Oh well . . . next time, I'll be better prepared!

I created a tag to hang through one of the holes in the binder page.  Here is what that looked like:


I used an aquapainter and ink from my Pumpkin Pie ink pad to paint the pumpkins from The More the Merrier stamp set (so many fun images in this set!!!), then colored in the mouths and noses with my YoYo Yellow marker (should have used the fine point end . . . can see on this piece that I wasn't as in the lines as I would have liked . . . but it just looks like the pumpkins have a happy glow about them, right?)  The leaves and stems were colored with Chocolate Chip and Old Olive markers.

- Michelle