Wednesday, June 30, 2010

Last Chance Today!!!

Today is the last day to order from the Stampin' Up! 2009-2010 Idea Book & Catalog -- so truly the last chance to get the items on the Last Chance lists!  To see what's on these lists (including some great sale items!), please be sure hop on over and visit my online store (click on the Shop Now button from my website and then select the "Last Chance" category). 

Today, I have some projects to share with you that I recently created using Last Chance items!  First up is a photo wallet project.  I made a batch of these last week to fill with photos taken during VBS and give to my students.  Had to make one for myself, too!  The outside had the class photo and here's what the inside of mine looks like:


For these wallets, I used retiring Ballet Blue cardstock, and the theme of our VBS was fishing/ "Hooked on Jesus", so I pulled out my long-retired Fishy Friends and Silly Sealife stamp sets, plus the coordinating wheel to create these projects. 

I modified this project for my Hostess Club this weekend, and we created a photo wallet using the Tropical Party Stamp Set from the Summer Mini, as well as some retiring stamp sets (Think Happy Thoughts, Itty Bitty Backgrounds, and It's a Plan).  Here's how that turned out -- first the outside:


The scallop frame was die cut using the Big Shot and the Scallop Frame die.  To create the tropical scene, we masked the sky and used the retiring Crushed Curry Classic Ink to sponge on the beach (and stamped some sand grains using the Itty Bitty Backgrounds stamps).  Then, masked the sun using a piece of paper cut out with the 1 1-4" Circle Punch and covered the beach, and sponged on the retiring Cameo Coral and Dusty Durango Classic Inks to create the sky.  After removing the circle mask, we sponged some Crushed Curry on the sun.  Then, the palm trees and grass were stamped with Close to Cocoa Classic Ink (also on the Last Chance List!)   

The Scallop Frame was sponged with Close to Cocoa ink, stamped with the beach grass stamp from Tropical Party, and then run through the Big Shot in the Square Lattice Textured Impressions Embossing Folder.  Here's a close up of that:


And, we stamped the inside of the folder as well:


These photo wallets are so easy to create -- you use one sheet of 8.5 x 11" card stock, scored at 4.25" and 8.5" on the 11" side.  Then, adhere the flap closed on the sides using Sticky Strip!

The second project we created at my hostess club was watercoloring the beautiful flower image from the Elements of Style stamp in the Summer Mini.  I had heat embossed these on Glossy White Card Stock using Black Embossing Powder.  Then, we used Lovely Lilac, Lavendar Lace, and Green Galore Classic Ink Refills for watercoloring.  I also showed the ladies how to create ribbon folds on their cards using White Organza Ribbon and Mini Glue Dots -- I've been seeing a lot of this ribbon treatment on cards lately, and just love it!  Here's the card we made:


The textured background on the Lavendar Lace layer of the card was created by running the card stock first through the Big Shot in the Square Lattice Textured Impressions Folder, and then offsetting it in the Vintage Wallpaper folder (a sneak peek item, which will be available with the new Idea Book and Catalog tomorrow!!!) and running it through the Big Shot again.

Finally, I wanted to share with you a baby card I created a while back using the Animal Stories Designer Series Paper (also on the Last Chance List):


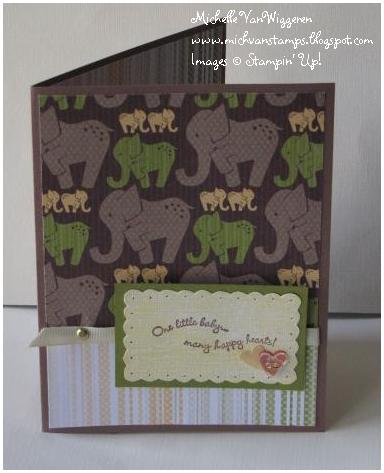
The card also uses the Curvy Verses and the retiring Framed with Love stamp sets.  And, I loved adding the Itty Bitty Clear Button on for an embellishment!  Here's a close up of that:
and a shot of the inside:

Wow!  Had a lot to share -- thanks for reading all that!!!  Stay tuned for cards using brand new paper and stamps tomorrow!!

- Michelle

Tuesday, June 29, 2010

Faux Stained Glass Window Frame

Hello!  Sorry for my absence . . . have been busy with summer activities with the boys!  We had a very fun week last week at VBS and I'm working on getting together some photos of a few special projects created for that, but in the meantime have another project I have been wanting to share with you for a while!  Here is a special photo frame I created a while back for my last swap with my friend Marlene:


To alter the frame, I started by painting Gesso over all of it (Gesso is basically a thick white paint . . . kind of like a primer).  Then, I stamped the flowers from the Fifth Avenue Floral stamp set all over the frame with versamark.  I sprinkled on clear embossing powder and heat embossed.  Then, I painted the frame using ink refills and my aquapainters.  The ink resisted the areas that had been embossed.

Finally, I sprinkled Glassy Glaze Enamel embossing powder on the still wet ink, and heated that with the Heat Tool.  While that was still warm, I added some additional Glassy Glaze.  I used my Versamark pad around the frame to apply another more even layer of Glassy Glaze, but that wasn't so kind to my poor ink pad!  It's a bit more colorful than I would like now!  I've since discovered that it is way better to simply brush on Versamark Ink Refill across the surface you want to cover and then put on the powder and emboss.  Live and learn! 

(By the way, the Glassy Glaze is a last chance item from Stampin' Up!  I believe it actually may have already sold out.  This is wonderful stuff -- I will really miss it!  However, you can achieve a fun faux stained glass look using layers of the Clear Embossing Powder as well.)

I wanted to add something inside the frame, so I created the flower art by sponging Versamark ink onto my Elegant Trio Decor Elements Stencil (had to buy this after seeing the beautiful projects Patty Bennett was creating with it!  For instance, check out this link) and then daubed on some Stampin' Pastels to add color!  This was so fun and easy!!!

Here are some close ups of this project:


One of the finishing touches I added was a Mini Vintage Tag -- love these, they have some vanilla shimmery cardstock in the center that is really beautiful!  I stamped the m with my Calendar Alphabet and Numbers -- love how that fit on there.  The Rough Type alphabet in the Summer Mini looks great on these little tags, too.  The tag is attached to the frame with a piece of Old Olive 5/8" Satin Ribbon!

- Michelle

Friday, June 18, 2010

Father's Day Cards

My Father's Day Card classes were this past Monday, and I had fun creating three different cards for that.  Here they are:


I've seen several versions of shirt cards, and for this one, I adapted instructions I found on Familyfun.com.  The shirt front is a single piece of 4.25 x 5.5" Bashful Blue Card Stock.  One inch long cuts were made at each side of the top, exactly 1 inch from the top, and then folded inward to create the collar.  The tie was cut out from Travel Journal Designer Series paper, and the small round buttons are Itty Bitty Buttons.  The shirt pocket was punched with the Small Tag Punch.  The shirt front was then glued to a 4.25 x 4.25" Bordering Blue card base (made from a folded 4.25 x 8.5" piece).  I thought keeping the shirt front separate from the base would make the card easier to open than the one in the original instructions!  The shirt pocket is fun -- it is attached with Sticky Strip on the sides and bottom, so a small message could be tucked in there.

The All in the Family card came from an idea my oldest son Daniel had.  He wanted to use a Tempting Turquoise card base and draw family figures on it (I'll have to see if he'll let me show you what he came up with!)  I used Top Note Die Cuts for the family images and also for the inside messages.  There is a piece of Tangerine Tango along the bottom, and a piece of Real Red 5/8" Satin Ribbon tied around the card.  Then, attached to the ribbon is a ribbon/badge that Dad can remove and wear -- it's made from a piece of round chipboard attached to a Real Red Scallop Circle cut with the 2-3/8" Extra Large Scallop Circle (a sneak peek item from the new Idea Book and Catalog!).  The message was stamped on that in Pacific Point.  A folded piece of 5/8" Real Red Satin Ribbon was added to that, and a pin was attached to the back.

Finally, the star background card is simple but uses a fun technique that I saw on Dawn Oleschefske's blog -- making your own texture plate for the Big Shot!  Dawn has a video on her blog that shows how to make the plate using Die Cuts, but it turns out it is also possible to cut the lighter chipboard (from the back of Designer Series Paper packages) with Stampin' Up!'s punches.  So, I used the Small and Large Star punches to create my texture plate.  After the running the Card Stock through the Big Shot on the texture plate, we sponged Champagne Mist Shimmer Paint onto the stars for some fun yet still-masculine-enough bling!

Happy Father's Day weekend to everyone!

-Michelle

Wednesday, June 16, 2010

Elegant Card For the Newlyweds

We've almost had a full week of summer vacation now!  We started this week with swim lessons, followed by two very fun Father's Day card classes.  I'll post the samples of the cards we made there in the next couple days, but first wanted to share with you a card that my friend Agnes and I made in a collaborative effort!  After the morning card class, Agnes mentioned to me that she needed a card for a wedding and we brainstormed some ideas for her card.  We ended up going with a Very Vanilla and Silver theme . . . here's the card we created:


The flowers from Elements of Style (in the Summer Mini) were heat embossed on the card and envelope using Versamark ink and Silver embossing powder.  The greeting is from Teeny Tiny Wishes, and was also embossed with silver embossing powder.   Then, it was punched out with the Word Window Punch, and layered on a Brushed Silver piece that had been die cut using one of the Stampin' Up! Lots of Tags Sizzlits in the Big Shot.  The silver strip on the side was punched with the Pinking Hearts Border Punch. 

Doesn't this look elegant?!

- Michelle 

Thursday, June 10, 2010

Teacher Thank Yous!

Both of my boys had their last day of the school year today!  Timothy's preschool celebrated with a picnic at the park, and we presented the teachers with some special surprise gifts.  For one of those, the kids each drew a small photo or had their parents write a special note, and I compiled all those in a little book for each teacher.  Here are photos of the finished books:


I used some retired designer series paper for the covers (the apple design was just too perfect!)  The pages were cut on the Big Shot, using the Scallop Square die.  The name label was also cut using the Big Shot tags sizzlit.  Had fun sponging around the edges of those -- and couldn't resist adding a bit of Champagne Mist shimmer paint again!  It really sparkled in the sunshine at the park!

The little bookplate image on the cover is from the First Day stamp set in the Summer Mini.  The branch and flowers were punched out using the Extra Large Bird Punch and the Trio Flower punch, respectively.  I love the Trio Flower punch, so was a little disappointed to see it on the Last Chance list!  If you don't have this punch yet, be sure to get yours before it is too late! 

The pages were cut from Tangerine Tango card stock -- Tangerine Tango is a former In Color that is returning July 1st as one of the new core colors in the Brights Collection!  It is such a happy, fun color, thought it was great for showing off the kids' art work.  Here's one of Timothy's drawings:


To bind the pages together, I punched through one corner of the book using the Crop-o-Dile, then inserted a binder ring.  Had to add some fun ribbons as a finishing touch as well. 

I wish I had thought about it soon enough to create a book like this for Daniel's teacher, too!  Maybe next year!

I also created some note card sets for each of the boys' teachers.  Here is what one of those looked like:


The apple stamp is from the Tart & Tangy stamp set.  I colored the images with Stampin' Write markers to get the different colors before stamping.  Clean, simple, and fun!

- Michelle 


Wednesday, June 9, 2010

Mojo Monday Coach Appreciation Cards

When I saw this week's Mojo Monday sketch, I knew it would be perfect for one of my big projects this week -- making thank you cards to give to our baseball coaches and team rep!   Daniel's Little League baseball team is named the Rivercats (after the Sacramento Rivercats), and I used the team colors for the card:


I used Riding Hood Red, Going Grey, Whisper White, Basic Black card stock on this card, plus some narrow strips of Pacific Point for the ribbon tags.  The yellowish paper is one of the designs from the Storybook Specialty Designer Series Paper (retiring soon -- get yours while it is still available!)  I sponged the edges of that with Soft Suede ink, and Champagne Shimmer Mist Paint (been a while since I'd played with that -- forgot how much fun that is!)

The baseball was created by punching a piece of Whisper White with the 1-3/4" Punch.  I drew the stitching on using a red Watercolor Pencil, then used a blender pen to smooth my lines out a bit.  I sponged the edges of the baseball first with Soft Suede ink, and then with Champagne Mist Shimmer Paint again.


The stars on the gray background are from the retiring Starring You stamp set, and were stamped using Versamark.  And, couldn't resist sponging some more Champagne Mist Shimmer Paint around them!

The All Star stamp comes from the Sporting stamp set (also on the Last Chance list!), and was stamped with Basic Black Craft Ink..  I doodled the lines around the grey piece that is on, using a Basic Black Stampin' Write marker.

And, I actually decorated the inside just a bit, too:


Had fun making these -- hope the recipients will enjoy them, too!

- Michelle

Wednesday, June 2, 2010

Lunchbox Accordian Album

The new Stampin' Up! Summer Mini has two new shapes of On Board Books (on page 23), and when I saw the Briefcase album, one of my first thoughts was how fun it would be to create a school lunch box shaped scrapbook with it!  So, I created one for my swap with my friend Marlene!   I combined the Briefcase On Board Book with paper and die cut adhesives from the Cool Kids scrappin' kit (on the Last Chance list!!!  Be sure to order yours before it's too late!), and with images stamped using the new First Day stamp set (on page 25 of the Summer Mini -- such a fun set for school pages, cards, and more!)  


The On Board Briefcase Book comes with eight chipboard pages and a ring to hold them together as an album.  For my project, I wanted to show a different way to use the chipboard pieces . . . so rather than putting all 8 together as a book, I used two pieces as the covers for an accordian album.  Here's my front cover:


the back cover:


and the inside pages:


the pages on the other side of the album:


and, some close ups of the pages:


Please let me know if you'd be interested in detailed instructions or a kit to make this project yourself! 

- Michelle

Stampin' Up!'s Last Chance Lists! and $99 Starter Kit Special

Stampin' Up! has now released the Last Chance lists for stamps, accessories, and Decor Elements that are being discontinued!  There are even some items that are on special, up to 50% off.  These items are only available while supplies last -- so please be sure to stop by my website soon to purchase the Last Chance items you want in my online store (to get there from my website's home page, simply click one of the Shop Now buttons)!

For your viewing convenience, here are some links to the different lists as well:

Last Chance Stamps
Last Chance Home Decor
Last Chance Accessories
Last Chance 25% Off
Last Chance 50% Off

(If you see something you want to purchase while browsing the lists, please be sure to select me as your demonstrator and shop through my demonstrator website to get the best pricing!  Or, you can always call or email me as well!)

Also, if you've ever thought about becoming a demonstrator, there is an amazing special this month!!!  Stampin' Up! is offering a special Mini Starter Kit, which comes with items valued at over $180, for only $99!!!  For more information about this special, please click here -- and feel free to email me with any questions about the different options for becoming a demonstrator!   If you'd like to sign up through me, you can visit my demonstrator website, click the join now button, and use my password:  circle of friends.

I'll be back soon with another of the projects I created for my swap with my friend Marlene!  You won't want to miss this one . . . stay tuned!

- Michelle