With Valentine's Day just a couple weeks away, it seems like a good time to do something sweet! So, I'm going to have another blog candy. To enter for this blog candy, all you have to do is leave a comment on my blog for this post. I'll randomly select three lucky winners, who will each receive one of the fabric flower pins I created, plus a real candy treat!
Please leave your comment by Monday, February 8th. I'll select and announce the winners on February 9th, so hopefully the winners will receive their goodies before Valentine's Day!
- Michelle

Friday, January 29, 2010
Thursday, January 28, 2010
Build a Bear Valentine's Tea Party Samples
In just about a week, I'll be having a special Valentine's Build a Bear tea party and class (for young and young at heart!) to make some cute projects and have some fun! We'll make two projects during the class. First, we'll dress up a bear for Valentine's. I have some new colors of bears die cut for this class. (My sample bear is cut from shimmery white.) And, each bear will have a special heart shaped pocket (cut from the Petal Card die) to go home in! Here's the photo of my sample:


There are still a couple spots in this class -- so, if you are in the Bay Area and would like to join the fun, please send me an email or give a call. Or, if you can't make it because you are not in the area or the time is not good, please let me know if you'd like a class kit instead!
- Michelle

For the second project, we'll make a Valentine's card using the Build a Bear stamps (including the new Beary Best Times stamps) and the gorgeous Sending Love Specialty Designer Series Paper. Here's my sample (at least so far -- still feel like it's missing something! Maybe needs a button or some ribbon?)

- Michelle
Wednesday, January 27, 2010
I {Heart} Hearts and Haitian Relief
 To help make a difference in the lives of those who suffered the devastating effects of the recent earthquakes in Haiti, Stampin' Up! is going to set aside $2 from the sale of every I {Heart} Hearts stamp set and donate it to the American Red Cross!
You can help make a difference, too -- and get a fabulous stamp set to use to make Valentine's and more! Email me or visit my website (and click shop now) to order your I {Heart} Hearts stamp set today!
P.S. Here are the images in the Stamp Set -- the set is also available in Spanish and French. (Cost is $ 26.95 for wood mount or $18.95 for clear mount).

These images are (c) 1990-2009 Stampin' Up!
Sunday, January 24, 2010
Heart-Shaped Message Boards
Today was my 4th Annual Hostess Appreciation Tea, and it was great fun to celebrate with many of the ladies who have been hostesses and loyal customers this past year (and previous years -- in fact, some for all 5 years I have been a Stampin' Up! demonstrator now!). Anyway, the special make and take I had planned for the party was a heart shaped message board.
In the Occasions Mini are new On Board Books. These are shaped chipboard albums -- you can choose from a Heart, Scallop Circle, and Bird! Any of those shapes would be great fun for this project -- although I have to admit, I think the heart is probably easiest in terms of requiring the least amount of cutting! The albums come with eight pages and a key ball chain to hold them together if you plan to use them to create a scrapbook. (My packages even had a "bonus sheet" of uncut chipboard -- I think to support and protect the die cuts in transit, but I definitely will be using that with the Big Shot to make some other shapes for other projects). However, the chipboard shapes can be used individually as well . . .
Stampin' Up! also recently released Chalkboard Decor elements sheets, and I'm really loving our new 5/8" Satin Ribbons. I thought it would be very fun to combine all these great products to make a heart shaped message board that could be hung from a door knob or on a wall -- or given as a gift to someone special. So, here's how my sample turned out -- first the chalkboard side:

And, for the other side, I used the Welcome Neighbor Designer Series Paper Pad (one of the products you can choose for free with your $50 order during Sale-a-Bration!) For embellishments, I added a bird and branch punched with the awesome new Extra Large Two-Step Bird Punch, and a greeting stamped with the new Well Scripted set (both the punch and the stamp set are in the Occasions Mini). I punched out the greeting with the Scallop Oval Punch, and sponged the edges. Here's how it turned out:

Here's a sampling of what my friends made at the tea:


And, while we were working with the Bird Punch, my friend Lea came up with the brilliant idea of creating a turtle from the pieces -- isn't this adorable?!

So much fun to have an afternoon crafting with friends! Thanks to everyone who came! And, if you couldn't be there this time, I hope you can join me for some stamping fun sometime soon!
If you'd like to order any of the supplies we used to create these projects, please send me an email or visit my website and click the shop now button in the upper right hand corner!
- Michelle
Thursday, January 21, 2010
Big Shot Flower Pins!
A couple posts back, I showed you this sneak peek photo:


Well, I'm ready to reveal what I did with these (in case you didn't guess from the post title . . . ):

I had great fun putting these together . . . I used the Big Shot to cut out the fabric. (The Fancy Fold Flower Die works great, but there are so many other fun dies that would work, too!) I was originally just going to use the new Pretty in Pink Corduroy Buttons from the Occasions Mini, but couldn't resist pulling some Chocolate Chip and Summer Sun Buttons in as well . . . plus some of the Latte Designer Buttons.
For directions on how to create your own flower pins, be sure to check out Stampin' Up! co-founder Shelli's original post on how she created hers or this great video (which shows how to assemble without any sewing)!
Most of these are for the wonderful ladies who have hosted workshops with me in the last year or so, but I'll be giving one of these pins away as part of some Valentine's blog candy . . . more details on that next week!
- Michelle
Wednesday, January 20, 2010
Sending Love Altered Pencil (and Treat!) Holder
The Sending Love Specialty Designer Series Paper is so gorgeous -- I love the sparkles on it! And, I know my friend Jana loves this paper, too, so when I saw a pencil holder at my favorite dollar spot, I just knew what I would do to make a thank you gift for her hosting a workshop with me! Here's the finished project:

I attached the designer paper with sticky strip, leaving about an inch of paper hanging off each end of the pencil holder. Then, I snipped the paper at the ends, and used to Sticky Strip to attach that the paper to the inside and bottom of the pencil holder. I covered the bottom with a piece of Real Red cardstock, cut in a circle. Then, I attached some of the luscious new Real Red 5/8" Satin Ribbon around the top and lining the top of the inside of the pencil holder!
Here's another shot, so you can see more of the beautiful flowers!

I filled the inside with chocolates in a cello bag, and make a tag for the bag (used the fun new Sale-a-Bration Whimsical Words set on it, plus some punched flowers, and a rhinestone brad for some bling!). The top of the cello bag is decorated with pink grosgrain ribbon -- attached with Sticky Strip! Got the idea when looking through the Idea Book and Catalog for about the millionth time -- in case you missed it like I did the first few times through, you can check out the sample on the top of page 42! You could do this with any type of ribbon -- in fact, the Satin Ribbon would look luscious, too!!! Anyway, back to the photos!


Please visit my online store to check out more of -- and order -- this wonderful Designer Paper and the other wonderful new products in the Occasions Mini! And, don't forget, for every $50 in merchandise, you get to choose a free product from the Sale-a-Bration catalog!!! Plus, if you are interested in purchasing the beautiful new 5/8" Satin Ribbons -- stayed tuned for details on a ribbon share I am putting together!
And, I'm still working on finishing up the projects I showed you a peek of last time . . . will be able to show you one of the finished projects tomorrow, though! Be sure to check back then!
- Michelle
Thursday, January 14, 2010
The Great Fabric . . . and Metal . . . Big Shot Experiments!
I've been busy the past couple of days preparing projects for upcoming events, trying out a few new Big Shot dies, and experimenting with some projects and techniques I've seen around the blogosphere!!! Some sneak peeks of what I've been working on:


Stay tuned to see the final products hopefully pretty soon!
Monday, January 11, 2010
A Valentine's Treat
Here's another of the projects I made recently with the Mini Milk Carton die -- this one is a Valentine's treatholder, cut out of a window sheet.
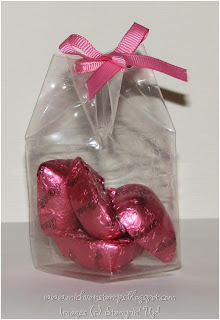


And, from another angle:

If you look really closely in the photos, you might be able to detect the hint of a flower pattern on the box . . . that's because after cutting out the box, I ran it through the Big Shot again using the Elegant Bouquet Textured Impressions folder.
I punched holes in the top of the box with my Crop-o-Dile, and used a Rose Grosgrain ribbon bow to close it!
- Michelle
Friday, January 8, 2010
More Candles Card
I had great fun playing with something called the Faux Frosting Technique (created by Marlize Morris, a Canadian demonstrator) while preparing for Jana's workshop last weekend. Here's one of the cards I came up with using that technique:

Then, I stamped the candles using Crushed Curry Classic Ink.
For the Faux Frosting, I squeezed Tombo Mono over the frosting, then sprinkled on a combination of clear embossing powder, Rose Pink Fine Cosmo Stampin' Glitter, and a touch of Light Pink Chunky Sprinkles. I heated that with my Heat Tool, and that was fun to watch the mixture puff up and then cool back down to create sparkly frosting!!!
The cupcake piece is layered on a piece of Rich Razzleberry Cardstock, the bottom of which was punched with the Scallop Trim Border Punch (told you I've been using this a lot!!!)
Then, that was layered on a piece of Melon Mambo -- I'd punched the bottom of that with the Scallop Trim Corner Punch (you don't just have to punch the corner of the paper with it -- it also can create a fun border!)
I layered that on a piece of Pumpkin Pie, then onto the textured Soft Suede card base. I tied a piece of Soft Suede Polka Dot Ribbon around the card front (polka Dot side down). Then, for a final touch, I added a Crushed Curry flower punched from the Trio Flower punch, with a rhinestone in the center from the new Eggcellent Egg Kit (awesome for more than just decorating eggs!!!).
I inked up the first part of one of my favorite greetings from the Sale-a-Bration set Whimsical Words -- "the more Candles" part, and stamped that with Soft Suede Classic Ink in the bottom right of the card.
I stamped "the bigger the Wish!" on the inside with another Crushed Curry flower, punched out with the Trio Flower Punch, and again, with a rhinestone in the center.
Here's the inside -- clean, simple, just needs a personal note for the recipient!

Hope you have a great weekend!
- Michelle
Thursday, January 7, 2010
Gingerbread House
Here's another sample using the new Mini Milk Carton die from the Occasions Mini. I first saw the die in December, and thought it would make a wonderful Gingerbread House! So, I had to give it a try. Here's what I came up with:

The house was actually made out of the cardboard that came in the package with the die, then I added the Real Red Roof -- plus some scallop edges and tiles made with the new Scallop Trim Border Punch, which has quickly become one of my favorites!
You can see I used the Scallop Trim Corner Punch to make the top of the door a bit more ornate as well. And, there are Bashful Blue windows around the house. To add some snow-like sparkle, I used the white Chunky Glitter, and used that in combination with the green Chunky Glitter for the snow-covered bushes around the house. There's a silver brad for the doorknob.
For the chimney, I used a pearl headed pin from my craft supplies, and a clear bead from the Pretties Kit. Here's a better shot of that:

And, one more photo from a different angle:

- Michelle

The house was actually made out of the cardboard that came in the package with the die, then I added the Real Red Roof -- plus some scallop edges and tiles made with the new Scallop Trim Border Punch, which has quickly become one of my favorites!
You can see I used the Scallop Trim Corner Punch to make the top of the door a bit more ornate as well. And, there are Bashful Blue windows around the house. To add some snow-like sparkle, I used the white Chunky Glitter, and used that in combination with the green Chunky Glitter for the snow-covered bushes around the house. There's a silver brad for the doorknob.
For the chimney, I used a pearl headed pin from my craft supplies, and a clear bead from the Pretties Kit. Here's a better shot of that:

And, one more photo from a different angle:

This was great fun to make! I think it would make a cute ornament (hard to tell from my photos, but these are actually quite small . . . maybe about 2 inches in width and 3 inches tall).
I'll be back tomorrow with a card to show you! (I do have one more Mini Milk Carton creation, but will show you that early next week . . . so stay tuned.)
- Michelle
Wednesday, January 6, 2010
A Touch of Spring!
The new products from the Occasions Mini are now officially available!!! I am really loving the new products I have so far -- and looking forward to getting more soon! Anyway, wanted to show you a project I recently made with the adorable new Mini Milk Carton die for the Big Shot. Thought you might enjoy something warm and spring-like since it was a chilly day today (at least here in the Bay Area). Here it is:

The milk carton was die cut from Barely Banana cardstock. After cutting it, I ran it through the Big Shot again, using the Elegant Bouquet embossing folder. Couldn't resist sponging on a little bit of Champagne Mist Shimmer Paint (which is actually still available now as a catalog write-in!!!) Then, cut and embossed some Whisper White butterflies using the brand new Beautiful Wings embosslit die. Love how the Embosslits both cuts and emboss at the same time -- so easy, and these butterflies are so adorable!
I sponged some of the butterflies with So Saffron Classic Ink and Shimmer Paint. Here's a close up of the ones on the top of the carton. The carton is closed using a silver Mini Library Clip.

I have some other projects I've made with these Mini Milk Cartons to show you, too! Check back tomorrow for another one!!!
- Michelle
Monday, January 4, 2010
Happy New Year!!!!
Happy New Year! Hope your 2010 is off to a wonderful start!
I've been doing some stamping and papercrafting already this year, and now that the holiday break is over, my schedule is starting to return to a more normal pace. So, I am excited to finally have a chance to start showing you what I've been making with brand new products from the Occasions Mini and Sale-a-Bration catalogs! You can order products (and earn FREE products from the Sale-a-Bration catalog) starting tomorrow!!! If you haven't had a chance to see these catalogs yet, be sure to click through above to see them, or you can shop from them at my Stampin' Up! website.
Anyway, my first workshop of this year was at my friend Jana's this past weekend -- and it was so fun to be able to start the new year stamping with friends!!! In fact, the project I want to show you is my sample for the make and take at her workshop. (You can see Jana's beautiful sample using the same basic supplies on her blog here.) Here's my card:

This card uses a strip of the gorgeous new Sending Love Specialty Designer Series Paper from the Occasions Mini. There are a total of 12 different designs in the package (there are 12 sheets in the package, and the paper is double-sided, so you get 2 each of the 6 double-sided sheets). And, one side of each of the sheets has glitter on it -- in fact, both Jana and I used the glittery side in our cards (the other side is really pretty, too, so not everyone at the workshop used the same side). This paper is definitely perfect for making Valentine's, but I love that there are images and patterns in the paper that could definitely work for other spring projects and occasions, too.
The ribbon on the card is the elegant new 5/8" Satin Ribbon from the Occasions Mini -- this stuff is amazing! I'm planning on offering a sampler club so you can get your hands on some yards of each of the nine colors of this ribbon without having to buy 15 yards of each roll -- if you'd be interested in participating, please let me know.
The Pretty in Pink cardstock strip underneath the designer paper was punched with the new Scallop Trim Border from the Sale-a-Bration catalog. This punch is so much fun to use -- seems like I've been adding this type of border all over my cards lately (you'll see more of what I mean soon!)
The focal image is from the Love You Much stamp set, and was stamped in Basic Black. Then, I used a Real Red Stampin' Write Marker to color in the letters. As a finishing touch, I put a silver brad in a Pretty in Pink flower punched with the Trio Flower Punch, and added that on top of the stamped flower image.
It was fun to see what the gals at the workshop did with this design -- wish I had taken some photos of their beautiful creations to be able to show you!
Happy Stamping!
Michelle
Subscribe to:
Posts (Atom)