Tuesday, October 29, 2013

SUper Friends September and October Swaps

My SUper Friends downline group has been swapping cards again, and I want to share with you some of the beautiful artwork they've created!

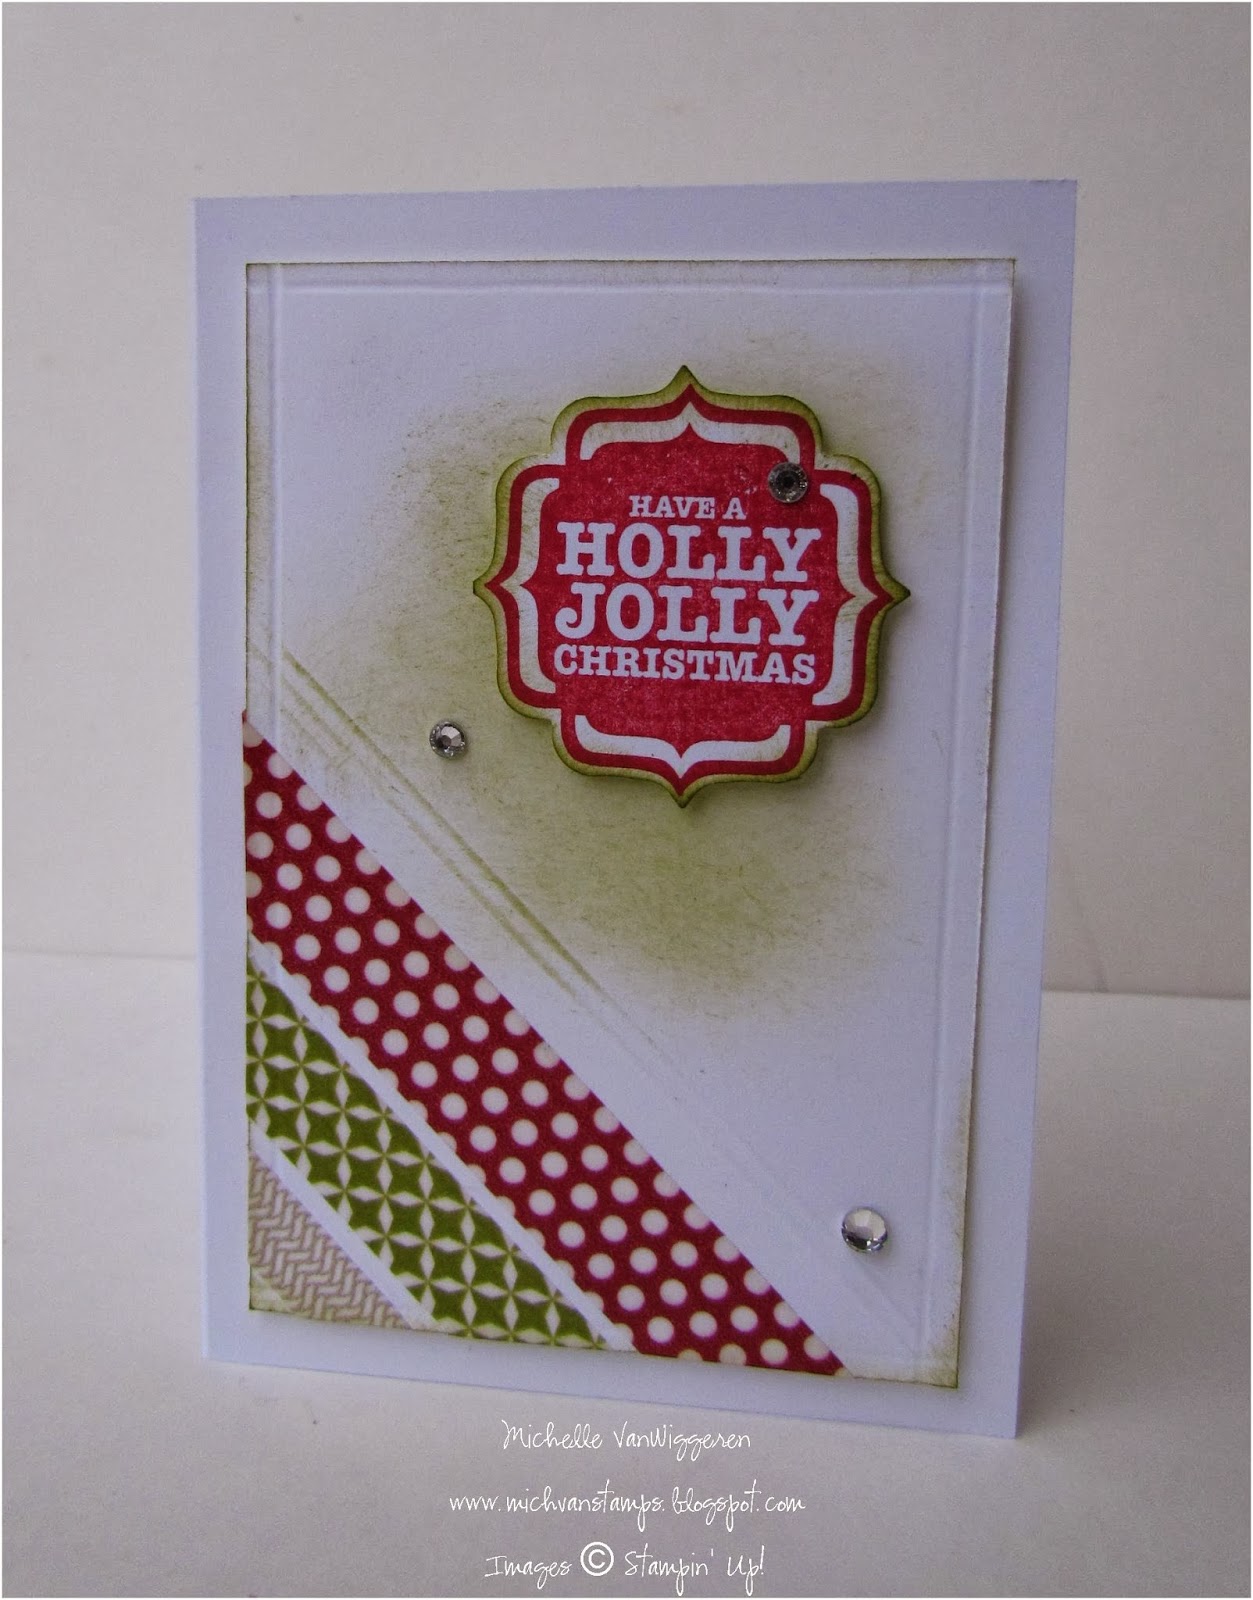
Here are September's swap cards all together:


You might recognize the card in the top right corner from my last post.  The card next to it is an amazing, interactive Halloween card, created by Motoe Tada, using the Peekaboo Frames Bigz L, along with the Halloween Hello, That's the Ticket, and Toil & Trouble stamp sets:


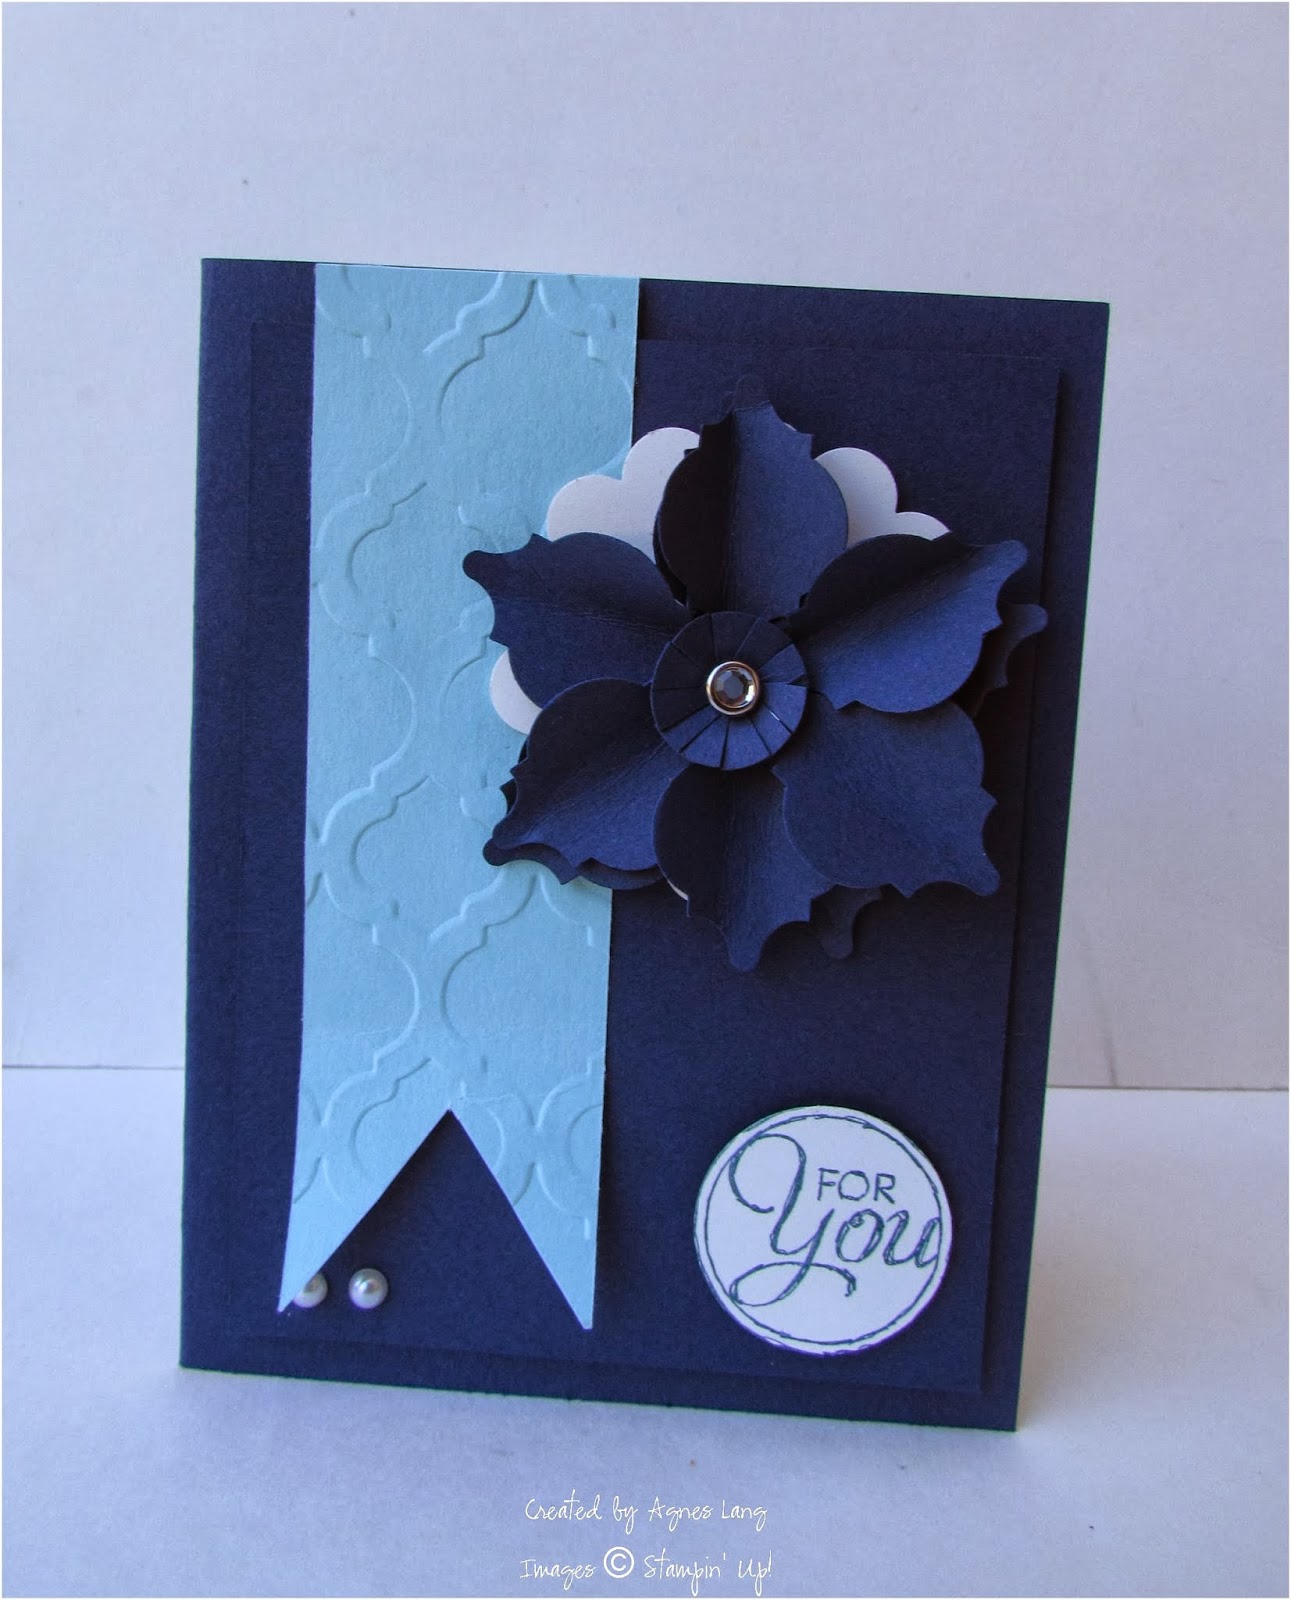
This beautiful, elegant card is created by Agnes Lang, and  features a beautiful, 3D flower made out of pieces punched using the Mosaic Punch.  The greeting is from the Chalk Talk stamp set:


I also love the color combo and layout on this gorgeous autumn card by Cheryl Shepard:


Her card opens to reveal this great surprise:


And, Nancy Poon created this perfectly elegant card using the Festive Flurry stamps and dies:


Then, last week, we met and swapped again!  Here are the October swap cards:


Here's Nancy's card -- she did an awesome job CASEing a card with Festive Flurry from Stampin' Success (Stampin' Up!'s special publication filled with ideas, samples, and more for demonstrators!):


Here is Agnes' beautiful autumn card using the Magnificent Maple stamp, Woodgrain Embossing Folder, and one of the Naturals Designers Buttons:
 And, here is a card I created, which is a CASE of a card on Stampin' Up!'s blog (it was a sample for one of the first Thank You Thursdays, and you can see it in this post!):


The background for my card is created using the Background Builders stamp set.  And, I used a Cantaloupe Crisp, Soft Sky, So Saffron, and Whisper White color combination.

Hope you enjoyed all the artwork and are inspired to create some great cards of your own!

Happy Stamping,

Michelle

Friday, October 25, 2013

Clean and Simple Cards with Tags 4 You

Hi, again!  Posts two days in a row -- can you believe it?!  :)

Today's cards are clean and simple cards I designed for my Holiday Catalog Open House last month.  We used Stampin' Up!'s Note Cards & Envelopes for these, along with the new Tags 4 you set and coordinating Label Bracket Punch.  Here they are:


I used the Simply Scored Tool to create the diagonal lines on the cards to help line up the Washi Tape.  A little sponging on the cards also adds a fun burst of color.

Thanks for stopping by!

- Michelle

Thursday, October 24, 2013

Yippee-Skippee for Marlene's Birthday Card with a Twist!

I've been quiet again because it's been a busy two weeks!  Had a few moments to blog today, though, so didn't want to miss the chance to tell you about some exciting things going on at Stampin' Up! and share a great card with you!!!  

Stampin' Up!'s birthday celebration is continuing -- and from now until October 28th, there are 25 fabulous stamp sets at 25% off -- including the Yippee-Skippee! set that my oh-so talented friend Marlene Caravello used inside this card with a twist (for another example and a link to a video tutorial on how to make these, please click here):


Marlene's card base is Crisp Cantaloupe (one of the yummy In Colors new for this year!), and she used the Birthday Basics Designer Series Paper (so fun!)  The tag on the front is cut using the Chalk Talk dies, which are actually one of the Thank You Thursday deals this week!   The "finally . . . " greeting is from the Really Good Greetings set.

Here's the inside of the card:


Marlene used Sassy Salutations (Happy Birthday), Giggle Greetings (cheese with candle, and "age is something . . ." image), Yippee-Skippee ("carbs, schmarbs! . . . ), and  Really Good Greetings ("(and it's all really good!)")

Another not-to-miss special is Stampin' Up!'s weekly deals.  Be sure to check those out, too!!

Thanks so much for visiting my blog!

- Michelle


Friday, October 11, 2013

Great Sport Soccer Thank Yous

Happy Friday!  A quick post today with a thank you card I created for my youngest son's soccer coach last fall (and hadn't gotten around to posting before now!)  It's about time to create a thank you for his league's referee appreciation day and for his coaches this year.  Hoping this will help inspire me -- and you, if you need to create some sporty thank yous, too!  Anyway, here's the card:


Supplies used:

Stamps:  Great Sport, Perfectly Penned
Ink:  Basic Black
Paper:  Bashful Blue, Whisper White, and Brushed Silver Cardstock
Accessories:  1-1/4" Circle Punch, Bitty Banner Framelits.

Thanks for stopping by!

- Michelle

Thursday, October 10, 2013

Marlene's Bewitching Trick or Treat Card

A while back, I received this amazing Halloween card from my amazingly talented friend Marlene Caravello, and those of you who've been able to come to my recent classes and events have been able to admire it, but I think it's about time I share it here, too! 

 Here's the front, which features two images from the Toil and Trouble stamp set -- the skeleton and the "eye of newt" piece that is die cut with the coordinating Apothecary Accents Framelits Die.  I love how Marlene used the Gorgeous Grunge stamp set to add just the right splattering of color behind the "eye of newt . . . " Shakespeare quote!  The touch of Witches' Brew Designer Washi tape in the corner is fabulous, too!


This card opens to reveal a spinner inside!!  One side of it:


And the other:


And, a close up so you can see the sparkle of the black Stampin' Glitter a little better:


Isn't this great fun!?!

Thanks so much, Marlene!  I love this card!

Hope you are inspired by it, too!  Thanks so much for visiting my blog!

- Michelle

Wednesday, October 9, 2013

My First Undefined Stamp: A Pumpkin Carving Cat!

It's been fun to see the great stamps everyone is making with Stampin' Up!'s new Undefined kits, and I just had to try my hand at it, too.  I decided for my first stamp to create a cute image for Halloween of a cat in a carved pumpkin.  Here's the sketch I started with, and the final stamped image:


The actual rubber stamp looks like this:


I ended up doing a fair bit of carving to get the final image how I wanted it to look.  Here's the first stamped image I produced with the stamp:


I wasn't so crazy about all the lines, so kept carving away, and testing and carving some more before I was satisfied at last!


Next, to create a project with my new stamp!  Stay tuned for that!!! 

I'm looking forward to making more stamps soon.  How about you?  Ready to try your hand at carving your own stamp?  

Thanks for stopping by!

- Michelle

Tuesday, October 8, 2013

Pedal Praise Paper Pumpkin Projects (try saying that 5 times fast!)

I've had great fun playing with my Pedal Praise Paper Pumpkin kit since it arrived (in August?  Has it really already been that long?)   The bicycle image from the kit is just so perfectly fun!!!  Here's what I've been creating with it so far:


I started with a card made following the instructions in the kit:

Then, tried a few variations on that:


(The last two use the technique of repeatedly stamping the image, a little offset each time, and without reinking, to give the illusion of motion . . . inspired by some samples I saw and pinned on Pinterest, as well)

I bet if you look closely you can tell how the next two cards are related:  


(In case you didn't catch it, the top card uses the negative left behind when I die cut the stamped bicycle image for the bottom card).  Also, the top one uses Hello to You stamp and the bottom one was a fun way to use up some leftover pieces from this, earlier Paper Pumpkin kit.

Then, I decided to switch things up some more, and use a slightly different color scheme (Marina Mist in place of the Bermuda Bay, as well as some Smoky Slate:


The top card in this set uses stamps from a collection of Paper Pumpkin kits (splatter from the Welcome Kit, dots from the Try It kit, "The Good Life" from the kit of that name, and of course, the bicycle).  The bottom card uses the big "thank you" from the Another Thank You Photopolymer stamp set.

Hope you enjoy these!  

By the way, Stampin' Up! has announced a new Weekly Deals program -- you can check out this week's great deals here (I've already taken advantage of the special on the square framelits and Today & Everyday Download!  Too good too pass up!).

Thanks for stopping by!

- Michelle

Monday, October 7, 2013

25th -- Clean and Simple

Here is a clean and simple card I created in honor of my husband's co-worker's 25th Anniversary with their company -- that's a great milestone!  


Supplies Used:
Stamp set:  Memorable Moments
Ink: Pacific Point
Paper: Whisper White, Pacific Point, and Silver Glimmer Paper
Accessories:  Apothecary Label Framelits, Brights Candy Dots


It's also Stampin' Up!'s 25th Anniversary this year, and this month, the celebration includes two great "25" specials!  Hostesses can get an extra $25 in hostess dollars with a qualifying "party" (of $250 in sales before tax and shipping) -- so it's a great time to schedule a workshop with me (or, if you prefer, you can do a virtual party with an online order or orders -- please ask me for more information about that if you are interested!)

Plus, if you've ever thought about becoming a demonstrator, now is definitely the time to give it a try -- for only a very limited time (from Oct. 7th through 21st), it is only $25 to join!!!  When you join Stampin’ Up! during this limited-time offer, you’ll get


  • $25 worth of products, plus business supplies!
  • A 30 percent discount on your first order! (Certain restrictions apply -- please ask me for more details!)
  • A 20 percent demonstrator discount everyday!
  • Access to great resources and training from Stampin' Up! through the demonstrator website, demonstrator magazine (Stampin' Success), and more!


Plus, you'll have the opportunity to create some amazing friendships make with other demonstrators, customers, and hostesses.  Enjoy the benefits of fun, friends, and creativity!

Thanks for visiting my blog!
Michelle