Wednesday, September 26, 2012

Butterfly Birthday Wishes

Hi, everyone!  Just a quick post today.   This card is a birthday card I made using one of Becky Fleck's 
CardMaps from June 2011:


The card base is So Saffron, with a layer of Whisper White on top of that.  The strips of paper are various designer series paper scraps from my stash, along with an embossed piece of Regal Rose and Certainly Celery.  The little flowers are also punches from my scrap pile.  The sentiment is from a favorite Sale-a-Bration set from long ago as well.

The butterfly is stamped using an image from the Papillon Potpourri set, and cut out with the coordinating Elegant Butterfly Punch.  I stamped the butterfly in Chocolate Chip, then gently sponged on So Saffron and Regal Rose.  I added some Basic Rhinestone Jewels for some sparkle.  Here's a close up:


Thanks so much for stopping by!

- Michelle

Monday, September 24, 2012

L'Eiffel Bridal Luncheon Invitations

In less than two weeks, one of my BFFs is getting married, and I'm really looking forward to being there with  her to celebrate her marriage.  We're having a bridal luncheon for her while I'm there, and it will be at a restaurant with Parisian decor and food.  I wanted to create some very special invitations to the luncheon that incorporated that theme along with Cherry Cobbler, which is pretty close to one of the colors she's chosen for the wedding.  Here's what I ended up designing:


The frame is from the Papaya Collage Stamp Set, the Eiffel Tower image and "Amour" are from Artistic Etchings, and background images are created with the French background stamp from French Foliage and with the Very Vintage Wheel.   "You're Invited" is from the retired Sincere Salutations set.  The frame, Eiffel tower, and "You're Invited" are heat embossed with Versamark and Black Embossing Powder.  

The heart background was created using a mask and sponging, and it's difficult to tell from the pictures, but is actually sparkly inside.  I embossed the inside of the heart with Versamark and Iridescent Ice Embossing Powder.

The right side of the Cherry Cobbler card base is embossed using one of the Delicate Designs Folders.

The ribbon looped under the greeting is the 1/2" Striped Satin Ribbon from the Holiday Catalog.

 I also decorated the outside of the envelopes to go along with the theme:


These were fun to create, and I hope the recipients were surprised and excited to find them in their mailboxes!  Hope you like them, too.

Thanks for checking out my blog!

- Michelle

Friday, September 21, 2012

Need for Speed Birthday Card

Here's a fun card I recently created for one of my 9-year-old son's friends:


I started with a Real Red card stock base.  Then, I added a layer of Real Red, embossed in the Chevron Embossing folder, which had been inked up with Basic Black ink.  I think it creates a kind of tire-tread-like effect, don't you?

The car is from the Need for Speed Stamp Set, and the "Happy Birthday" from the Perfectly Penned Stamp Set.  Those were stamped in Basic Black on Very Vanilla.  The Very Vanilla is framed with a layer of Basic Black Card Stock, and I added a piece of Basic Black, punched with the Petite Pennant Punch on the side.  The pennant was stamped with an image from the Pennant Parade stamp set, using the Illuminate Glimmer Watermark Stampin' Pad.  I also used Illuminate ink with the So Many Stars Builder Wheel to add some stars in the background of the Very Vanilla piece.

Thanks for visiting my blog!

- Michelle


Thursday, September 20, 2012

Sweet Cards from Friends!

Here are some wonderful cards I've received from friends.  They made my day, and I hope they make you smile, too!

First up is a card I received from my dear and talented friend Connie.  She used the Reason to Smile stamp set with 3 of the new In Colors (Midnight Muse, Gumball Green, and Summer Starfruit -- a great combo!) to make this beauty:


Very classy!!!

The next two cards are from my sweet and talented friend Marlene.  This card is shaped like the canning jar from the Perfectly Preserved set, but is a bit bigger.  Marlene used the Friendship Preserves set to make the label, and Comfort Cafe Designer Series Paper tied with Early Espresso Baker's Twine for the "fabric" covering the lid.


So very clever!  And, here is a fun fall window card from Marlene:


It looks like Marlene used the Woodgrain Embossing Folder with the new Early Espresso Core'dinations Card Stock for the front panel.   The leaf on the inside is cut with the Autumn Accents Bigz Die and embossed with the Spider Web Folder.  The fun fall paper in the background is the Orchard Harvest Designer Series Paper.

Thanks so much for stopping by!

- Michelle

Wednesday, September 19, 2012

A Case of Watercolored Blessings

Hi, everyone!  Here's the second card sample I created for this past Sunday's Creative Connections class.  For this card, I started with a sample I spotted in Stampin' Up!'s wonderful magazine for demonstrators, Stampin' Success.  There are so many beautiful ideas in there -- definitely one of the great perks of being a demonstrator!   

One of the things that caught my eye in the Stampin' Success sample was that the artist used the new Woodgrain Textured Impressions Embossing Folder as a stamp!  Don't know why, but that hadn't really occurred to me before, but that's something I'll definitely be trying again with the Woodgrain and other embossing folders.  I also ended up changing one of the layers in the middle of the card to include some actual embossing, and switched out the Vintage Faceted Designer Button they used for one of the Brushed Bronze Designer Buttons.

Here's my version:


The card base is Soft Suede, and I used the direct to paper technique with Whisper White Craft Ink on it.  The image from the Full of Blessings Stamp Set is embossed on Watercolor Paper with Versamark and Early Espresso Embossing Powder.  I watercolored the image using Stampin' Write Markers and a Blender Pen.

The middle layer is Very Vanilla card stock, embossed with one of the Delicate Designs Folders, and lightly sponged with Soft Suede ink.

The bottom layer is Old Olive, stamped with the Woodgrain folder and Old Olive ink.  I tied Early Espresso 1/8" Taffeta Ribbon around that layer several times and then into a bow.

There's Natural Linen Thread threaded through the Brushed Bronze Button.

During class, I actually had a chance to make one more of these, and for my second card, I did the watercoloring using Stampin' Write Markers and an Aquapainter, which resulted in a more subtle look:


I sponged the edges of the Watercolor Paper on this one with Soft Suede (thanks for the great idea, Rach!)  I also decided to tied my ribbon a little differently, and so far I'm liking this version better without the button. What do you think?

Thanks for visiting my blog!

- Michelle

Monday, September 17, 2012

Noel . . .

I had my September Creative Connections class yesterday, and as I was planning for it, decided that one of the cards we would make this month should be a Christmas card -- definitely not too early to get started making these!  I also wanted to use a combination of the Natural Composition Specialty Paper with music notes and the Champagne Glimmer Paper.  That combo turned out to be a little tricky, but I think it worked out well:


Here's another view:


 And, the finished inside:


The card base is Cherry Cobbler, and I stamped the background of it several times with the snowflake-like image from Mixed Medley (one of the hostess stamps in the Holiday Catalog) in Cherry Cobbler ink.  The same image appears on the Whisper White layer on the inside.

The Natural Composition layer is inked with Whisper White Craft Ink, using the direct to paper technique.  In other words, I swiped the ink pad across the paper.  "Noel" is from Greetings of the Season, and is stamped in Cherry Cobbler Classic Ink.

The snowflake is Whisper White Card Stock die cut with the Snow Flurry Bigz Die.  The largest snowflake layer is actually cut twice, but on one of those, I trimmed off the circular end piece.  This snowflake is inspired by one on a card at the top right of page 14 of the Holiday Catalog.

Under the snowflake, is a piece of the Champagne Glimmer Paper, die cut with one of the Apothecary Labels Framelits.

Thanks for stopping by for a little Christmas in September!

- Michelle


Sunday, September 16, 2012

One Layer WOW for LNS

This week's challenge over at Late Night Stampers (LNS190) is to create a single layer card with a WOW technique!  Well, I've been wanting to do it all week, and finally had a few minutes today to create my card for this challenge.   I've also wanted to create a one layer watercolored card ever since I saw these beautiful cards by Maile Belles, and this seemed like the perfect opportunity.  Here's how my first attempt turned out:


I used Shimmery White Card Stock for it, which worked okay . . . the little sparkles in the paper that you can see in real life (although not so much in my photo!) are pretty, but I think this technique really would work even better with actual watercolor paper!  So, will have to do that for my next attempt!

The stamped images are from the Just Believe Stamp Set and were embossed in White Embossing Powder,  Then, I watercolored over the image using an Aquapainter, and picking up ink I squeezed out of my Midnight Muse, Gumball Green, Summer Starfruit, and Pool Party ink pads.  I also used a Stampin' Spritzer to spritz on some water and help my colors spread and blend better.

For an added touch of elegance, I used my Simply Scored Tool to add three scored lines on each side of the card.  Then, I finished the card by adding three Basic Pearl Jewels in each corner.

Hope you like this one!  Thanks for visiting!

- Michelle


Thursday, September 13, 2012

Angry Birds -- Red Bird Birthday Card

I wanted to create an Angry Birds birthday card for one of my boys' friends this weekend, so did a search and found this card, which pretty directly inspired this card:


The card base is Baja Breeze.  The starburst-style background is Marina Mist card stock.  To create it, I started with a 4.25 x 4.25" piece of card stock (to match the size of the folded card base), then I cut the paper into the triangles, with all cuts starting from roughly the same center point.  I glued down every other piece I cut.  Then, used the remaining pieces to create another starburst background.

For Red Bird, I started with 2-1/2" Circle Punch-ed pieces of Poppy Parade and Whisper White, and punched the Poppy Parade piece in the circle punch a second time so the white tummy would show through. The crest and tail feathers are created with the tall, skinny heart from the Triple Heart Punch.  The eyes are created with 3/4" Circles of Whisper White and the small circle from the Itty Bitty Shapes Punch Pack in Basic Black.  For the beak, I started with a hand-cut rectangle of Daffodil Delight, sponged with Pumpkin Pie, and cut across the diagonal.  The eyebrows started as a Word Window Punched piece of Basic Black, trimmed to shape.

This was a fun card to make, and I hope the birthday boy liked it, too!

Thanks for visiting my blog!

- Michelle

Wednesday, September 12, 2012

Ribbons Galore!!!

Have you heard the news?   Stampin' Up! has an amazing promotion this month -- while the kids are going back to school, we can go back to spool!  --  for each $40 in merchandise you buy, you can choose one FREE package of the new In Color 3/8" Stitched Satin Ribbon (an $8.95 value!!!)   The ribbon comes in 5 colors -- Gumball Green, Midnight Muse, Primrose Petals, Raspberry Ripple, and Summer Starfruit!  Which ones will you choose?!!!


And, if you are still craving more great ribbons and accessories, be sure to check out my new Ribbon and Embellishment shares!

Thanks for stopping by!

- Michelle

Friday, September 7, 2012

Oops! I've done it again . . .

I'd been pretty good, well at least until May, at posting the calendar pages I created for this year using My Digital Studio.  I was just looking at my calendar as I'm working on scheduling classes for the next few months, and realized it's been a while since I had shared any of my MDS calendar pages with you.  So, I'll make up for that today by sharing both my August and September pages!

For this year's August pages, I chose to use some of my favorite back to school photos from August 2011:


And, my September photos are from a favorite fishing trip in September 2011 (you might recognize the photo on the left from a scrapbook page I created featuring the same photo and have posted here, too):


Again, these pages are pretty simple, keeping the focus on the photos!  The background papers and the month's names are from the 2012 Year to Remember Download.  The only other element I added is the banner behind the name of the month, and that is just created using the Flag digital punch (or two put together, in the case of the August page).

Thanks for stopping by!

- Michelle

Wednesday, September 5, 2012

Keep Calm and Stamp On

Here's a card I created as a special thank you for some stamping friends last month:


I started with a Pool Party Card Stock base, and die cut a window in it using one of the Apothecary Labels Framelits and the Big Shot.  I adhered a piece of Very Vanilla behind the card front, and stamped the words from the Carry On stamp set on it in Pacific Point.  

The strips of paper are from the International Bazaar Designer Series Paper.  The bow is made from Calyspo Coral 3/8" Ruffled Ribbon.  And, the crown image from the Carry On set is stamped in Pacific Point on Very Vanilla, then punched out with the 3/4" Circle punch.  There's a Rhinestone Jewel adhered to the top of the crown.

Thanks for stopping by! 

- Michelle


Tuesday, September 4, 2012

My Digital Solution!

Happy Tuesday!  It's Digital Download day at Stampin' Up!  You can follow this link to see all of today's great new downloads, and don't forget that the 31% off select digital content has been extended to Sept. 14th (follow this link to see which downloads are 31% off)!  

I recently finished a scrapbook with some old photos from my senior year of high school and wanted to create a special cover page for the album.  Well, I decided to create something quick and easy in My Digital Studio.  Here's what I made:


One of the neat new additions in MDS2 is that you can find a supply list for your project under the "Check Project" tab.  So, check out the supplies I used on this page:

Background
     Card Stock\Old Olive

Embellishments
    Brads\Calypso Coral - brad
    Brads\Calypso Coral - brad
    Brads\Pumpkin Pie - brad

Stamps
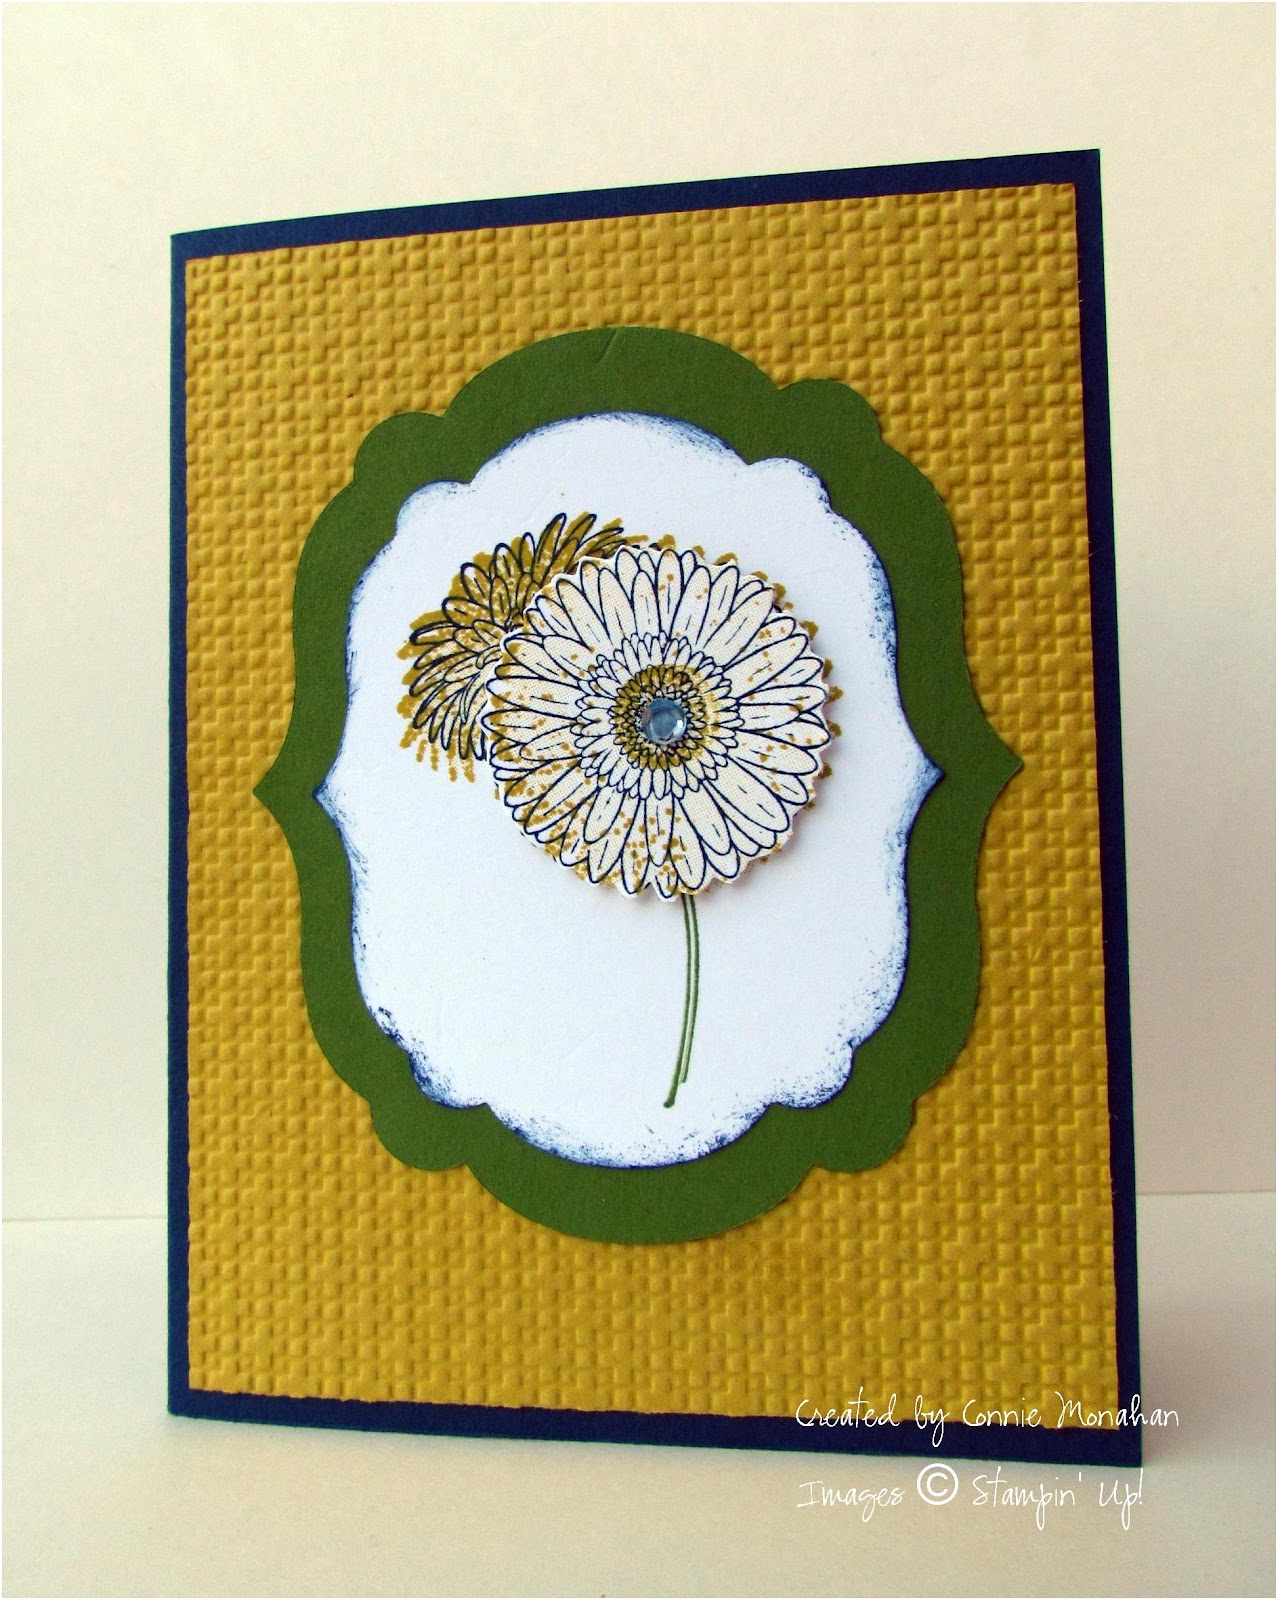
    Fabulous Florets\Fabulous Florets - leaf, Color = GUMBALL GREEN 105,132,51

Punches
    Labels & Tags\Curly Label Punch, Fill Color = MIDNIGHT MUSE 17,69,93
    Extras\Flag Punch, Fill Color = WHISPER WHITE 255,255,255
    Alphabet & Numbers\Timeless Type Junior Numbers\Timeless Type Junior Numbers - 1, Fill Color = WHISPER WHITE 255,255,255
    Alphabet & Numbers\Timeless Type Junior Numbers\Timeless Type Junior Numbers - 0, Fill Color = WHISPER WHITE 255,255,255
    Alphabet & Numbers\Timeless Type Junior Numbers\Timeless Type Junior Numbers - 9, Fill Color = WHISPER WHITE 255,255,255
    Alphabet & Numbers\Timeless Type Junior Numbers\Timeless Type Junior Numbers - 9, Fill Color = WHISPER WHITE 255,255,255
    Alphabet & Numbers\Timeless Type Junior Numbers\Timeless Type Junior Numbers - 1, Fill Color = WHISPER WHITE 255,255,255
    Alphabet & Numbers\Timeless Type Junior Numbers\Timeless Type Junior Numbers - 9, Fill Color = WHISPER WHITE 255,255,255
    Alphabet & Numbers\Timeless Type Junior Numbers\Timeless Type Junior Numbers - 9, Fill Color = WHISPER WHITE 255,255,255
    Alphabet & Numbers\Timeless Type Junior Numbers\Timeless Type Junior Numbers - 1, Fill Color = WHISPER WHITE 255,255,255
    Flowers\Fun Flower - 2, Fill Color = BARELY BANANA 255,237,153
    Flowers\Fun Flower - 1, Fill Color = APRICOT APPEAL 255,207,145
    Flowers\Fun Flower - 4, Fill Color = BARELY BANANA 255,237,153

Photos
    Designer Series Paper\_Designer Kits\Year to Remember 2012 Calendar\Year to Remember - pattern 02


I designed my cover page as an 8 x 8" page, and printed it on my home printer.  However, I forgot that my printer does not usually print my MDS projects true to size (it shrinks things to fit its preset margins, which there are ways around, but that's another story for another time!)  


I printed on Whisper White, and trimmed away the non-printed areas:


Then, I adhered my title page to a piece of So Saffron (actually from the first official page of the scrapbook).  


I'm pretty happy with how this turned out -- sure is great to have My Digital Studio to turn to for quick and easy scrapbooking and paper crafting solutions!  

Thanks for visiting my blog!

- Michelle

Sunday, September 2, 2012

A Little Sunday Mojo

We're having a pretty relaxing Sunday here, and that meant that at last I had an opportunity to try out this week's great Mojo Monday sketch #256:


If you follow my blog, you might have noticed I really like banners, and this one has 3 -- how could I resist?!  I opted for a square card, and this is how it turned out:


The card base is So Saffron, and I layered a piece of Floral District Designer Series Paper on top of it.  The vertical banners are created from a piece of Floral District paper and a piece of So Saffron, respectively.  The horizontal banner is a piece of Old Olive, which I embossed using one of the Delicate Designs Textured Impressions Embossing Folders.  On top of that is a piece of Old Olive, which I die cut with one of the Apothecary Labels Framelits and then embossed with the oval Designer Frames Embossing Folder -- don't you like how they fit together?  I punched out a piece of Whisper White using the Large Oval Punch, stamped it with "thank you" from the Made for You stamp set, and sponged it with Raspberry Ripple.

To create the butterfly, I stamped the image from Papillon Potpourri in Raspberry Ripple on Whisper White. I punched it out with the Elegant Butterfly Punch, then sponged the image -- first with So Saffron, and then around the edges and center with Raspberry Ripple.  Here's a close up:


For the finishing touches, I added three Rhinestone Jewels, which I dyed pink using a permanent marker.

Hope you find some time to be creative this weekend, too!  Thanks for visiting my blog!

- Michelle